• Home
  • Ubuntu 18.04
    • Whats New?
    • Upgrade Ubuntu
    • Install Java
    • Install Node.js
    • Install Docker
    • Install Git
    • Install LAMP Stack
  • Tutorials
    • AWS
    • Shell Scripting
    • Docker
    • Git
    • MongoDB
  • Funny Tools
  • FeedBack
  • Submit Article
  • About Us
TecAdmin
Menu
  • Home
  • Ubuntu 18.04
    • Whats New?
    • Upgrade Ubuntu
    • Install Java
    • Install Node.js
    • Install Docker
    • Install Git
    • Install LAMP Stack
  • Tutorials
    • AWS
    • Shell Scripting
    • Docker
    • Git
    • MongoDB
  • Funny Tools
  • FeedBack
  • Submit Article
  • About Us

How to Configure Chroot Jail in VSFTPD

Written by Rahul, Updated on July 11, 2015

What is Chroot jail ?
[ definition at wikipedia ]
A chroot on Unix operating systems is an operation that changes the apparent disk root directory for the current running process. Read more about chroot and implementation..

Why use Chroot jail in VSFTPD ?
Chroot jail is used for that any user login to ftp cannot access filesystem outside of its home directory. For example if chroot is not enabled and login to ftp server and try to access any location like /etc/httpd/conf for /etc directories.

chroot-jail-disabled

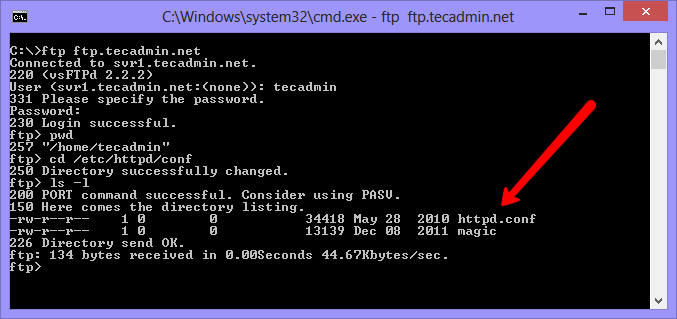
As per above screenshot, you can see a normal user ‘tecadmin’ can view the apache configuration files. Although you can go anywhere ( all directories ) in system.

Enable Chroot Jail in VSFTPD

To enable chroot jail in vsftp, Edit vsftp configuration file in your favorite editor

# vim /etc/vsftpd/vsftpd.conf

and un comment or add following entry in configuration file

chroot_local_user=YES

After adding above line, save file and restart vsftpd service.

# service vsftpd restart

Now your vsftp server has enabled chroot jail and all users has limited access to there home directory.
Check the below screenshot created after enabling chroot jail and compare difference with old screenshot.

chroot-jail-enabled

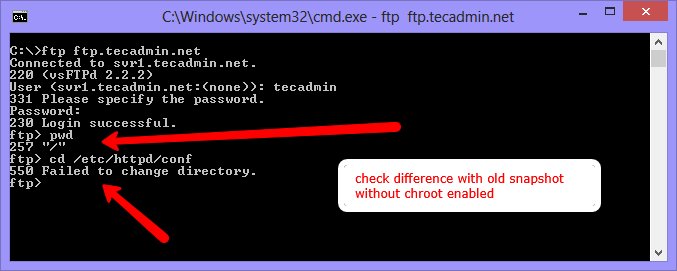
You can see that now user ‘tecadmin’ has limited access to there home directory only.

Share it!
Share on Facebook
Share on Twitter
Share on LinkedIn
Share on Reddit
Share on Tumblr
Share on Whatsapp
Rahul
Rahul
Connect on Facebook Connect on Twitter

I, Rahul Kumar am the founder and chief editor of TecAdmin.net. I am a Red Hat Certified Engineer (RHCE) and working as an IT professional since 2009..

2 Comments

  1. Avatar Jason Reply
    September 11, 2013 at 1:51 pm

    Thanks so much! This was incredibly helpful…..

  2. Avatar Patrik Reply
    September 11, 2013 at 1:49 pm

    Very good info about security… thanks for sharing this article…..

Leave a Reply Cancel reply

Popular Posts

  • How To Install Python 3.9 on Ubuntu 20.04 5
  • How To Install Python 3.9 on Ubuntu 18.04 0
  • How to Use AppImage on Linux (Beginner Guide) 2
  • How to Install Python 3.9 on CentOS/RHEL 7 & Fedora 32/31 0
  • How To Install VNC Server on Ubuntu 20.04 1
© 2013-2020 Tecadmin.net. All Rights Reserved | Terms  | Privacy Policy