Apache mod_deflate module is responsible for the DEFLATE output filter that allows output from your server to be compressed before being sent to the client over the network. mod_deflate is the replacement of mod_gzip which was used with older version of Apache.
The users with cPanel access only can also enable the Gzip compression. Follow our other article to enable Apache Gzip Compression in cPanel only account.
The users with root access can use the WHM panel and enable Apache mod_deflate globally for all cPanel users. Let’s follow the below steps to enable apache Gzip compression (mod_deflate) for all cPanel accounts.
Step 1 – Login to WHM Panel
You must have the root credentials of your system to get access to the WHM panel. It is required to make changes globally in a cPanel server. The default WHM is accessible on 2087 (SSL) and 2086 (non-SSL) ports.
Open a web browser and access the WHM Panel:
https://11.22.33.44:2087
Login with the administrator (root) account.
Step 2 – Edit Apache Pre VirtualHost
You need to added your settings in Pre section of Virtualhosts. So it will be loaded by the all Virtualhost in server. Let’s navigate to the below location in WHM:
Home » Service Configuration » Apache Configuration » Include Editor
Edit Pre VirtualHost Include (All versions) as per shown in below screenshot:
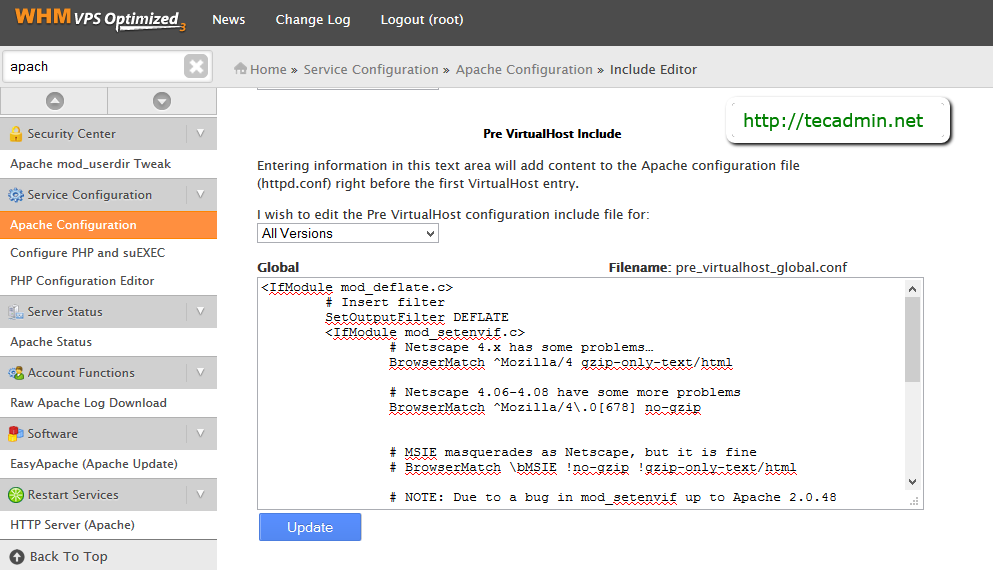
You may get this box empty for previously added settings.
Step 3 – Update Pre VirtualHost
Append the below configuration to the Pre VirtualHost editor and save it. Don’t overwrite any existing configuration, that are added for other purposes.
<IfModule mod_deflate.c> # Insert filterSetOutputFilter DEFLATE <IfModule mod_setenvif.c> # Netscape 4.x has some problems…BrowserMatch ^Mozilla/4 gzip-only-text/html # Netscape 4.06-4.08 have some more problemsBrowserMatch ^Mozilla/4.0[678] no-gzip # MSIE masquerades as Netscape, but it is fineBrowserMatch bMSIE !no-gzip !gzip-only-text/html # Don’t compress imagesSetEnvIfNoCase Request_URI .(?:gif|jpe?g|png)$ no-gzip dont-vary </IfModule> <IfModule mod_headers.c> # Make sure proxies don’t deliver the wrong contentHeader append Vary User-Agent env=!dont-vary </IfModule> </IfModule>
The above configuration has been taken from Here. So read this article carefully before implementing it.
Save the changes and you will get a restart Apache button. Restart Apache service to apply all changes.
Conclusion
In this tutorial, you have learned to enable Gzip compression server-wide (globally) on a WHM/cPanel server. Now, use this link to verify your server gzip using one of domain configured on server.


32 Comments
Excelente aporte, muchas gracias.
Thank you 🙂 Noticeable speed
Worked perfectly, Thanks!!!
It works thank you
Good post. I learn something new and challenging
Thank you for the good article!! It saved me quite some httpd.conf fiddling!
great article! thanks for sharing!
I actually never comment on such things but this is absolutely amazing.
So easy and works so perfectly…
This Wes very easy… Thanks!
This is very nice tutorial, Thank you for sharing with us 🙂
Awesome, works on CentOS 7.3 with WHM 64.
nice article, you save my day : )
Awesome, works on CentOS 7.3 with WHM 64.
Thank you!
Thank you Rahul that’s work for me. Keep sharing such type of Knowledge 🙂
Thanks for the information.I had been looking for way to compress content on my website and this by far is the easiest and best.
Nice Information, Its Working my WHM.
Thanks
This is very easy! Thanks. I’ve ready in other site using EasyApache but not as easy as this
Very Good Article And it works for me
Thank you
Thank you very much.
wow is so nice article, and worked for me, thanks
I cannot thank you enough. It actually works beautifully. You have also explained it in such a easy implementable way. Setting it up was a breeze. I looked for this information earlier also, but couldn’t find anywhere on the net. But I guess I got lucky this time. Just implementing this increase speed up by 10%.
Thanks for this tutorial.
It very helpful for Me.
Very very thx “tecadmin.net”.
I am so grateful for your post .Really looking forward to read more. Keep writing.
This was too easy. Thanks
Saved lots of Gigabytes worldwide!! 😉 Thanks mate!
hi,
nice tutorial, thanks for info
This thing works very well, thanks alot..
Thank you for the tutorial…:)
This is very easy! Thanks. I’ve ready in other site using EasyApache but not as easy as this
Great thanks for posting
Thank you for this! We have rolled out this globally with our servers! With Deflate sites looks to be working better and faster.
Thanks!