Using HAProxy, you can construct high-availability systems and HAProxy stats provide detailed statics. It can be used with popular servers like Apache, Tomcat, NGINX, and others. This post describes how to enable HAProxy statistics on your machine. After you have configured and installed HAProxy on your system, you may monitor its statistics to determine its current performance.
With HAProxy Stats, you can view information about the number of connections, data transfer, server status, and more. Because it is browser-based, you can use a web browser to get real-time information about your HAProxy implementation. In this article, we delineate how to enable HAProxy Stats on your system. Perform these procedures only if you’ve installed and configured HAProxy on your server.
Step 1 – Enable HAProxy Statics
You would need privileged account access to the HAProxy server. Open a terminal and edit the main HAProxy configuration file in text editor:
sudo vi /etc/haproxy/haproxy.cfg
Add the configuration that begins with the “stats” keyword.
listen  stats   192.168.10.10:1936
        mode            http
        log             global

        maxconn 10

        clitimeout      100s
        srvtimeout      100s
        contimeout      100s
        timeout queue   100s

        stats enable
        stats hide-version
        stats refresh 30s
        stats show-node
        stats auth admin:password
        stats uri  /haproxy?stats
The first line of the code specifies the IP address where HAProxy statistics are available. It is also listening on port 1936. When you use a web browser to request HAProxy statistics, you must provide a username and password. The last line specifies the URL where you can access HAProxy statistics. You are free to change it as you wish. The last bit of information is a username and password, which are admin and password, respectively.
HAProxy must be restarted to take effect after you save and exit the configuration file.
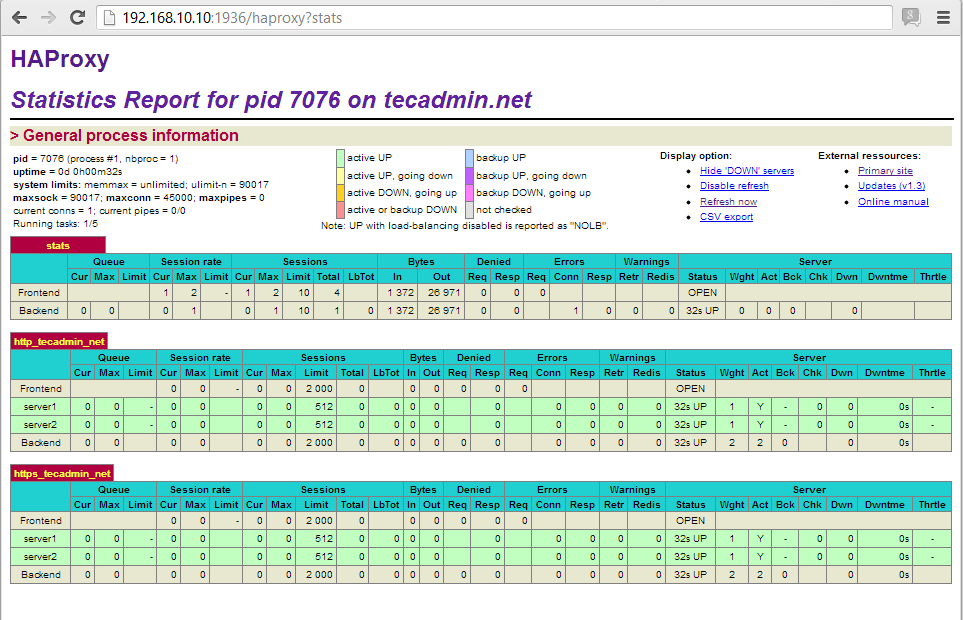
Step 2 – Access HAProxy Stats
You can access HAProxy stats using the following URL. Use your server ip address followed by stats uri in above configuration. Use login details configured with stats auth in configuration file.
 URL: http://192.168.10.10:1936/haproxy?stats
 Login user: admin
 Login password: password
Step 3 – Change Login Details
If you want to change the login in HAProxy stats configuration, edit the main configuration and update the “stats auth” value as shown below:
stats auth username:password
Save the configuration file and restart the HAProxy service to apply changes.
Step 4 – Change HAProxy Stats URL
The HAProxy URL is fully customization. You can set any sub URL as the HAProxy statics URL. To change URL of HAProxy stats edit the configuration file and update the following value.
- FROM:
stats uri /haproxy?stats
- TO:
stats uri /stats
Save the configuration file and restart HAProxy to update the service. Now you can access URL like http://192.168.10.10:1936/stats.
Haproxy stats configuration has been completed successfully.
Conclusion
One of the finest load balancers to construct high availability systems is HAProxy. With Apache, Tomcat, NGINX, and other popular servers, HAProxy can easily be configured. In this piece, we’ve learned how to activate HAProxy statistics on our system. After you’ve installed and configured HAProxy on your system, you may turn on its statistics to obtain real-time information about your load balancer.


6 Comments
My stats page is working fine but seems like I can only get to it thru IP. I have a DNS server and it resolves but if i do like http://haproxy.REMOVED.local:9136 it doesn’t work. But if I go to http://192.168.0.60:9136/ it works. Pinging haproxy.REMOVED.local resolves.
bellow my config file,
But statics is not work. I can’t access via browser.
any recommand?
=======================================================================================
global
log 127.0.0.1 local2
chroot /var/lib/haproxy
pidfile /var/run/haproxy.pid
maxconn 40000
user haproxy
group haproxy
daemon
stats socket /var/run/haproxy.cmd
defaults
mode http
log global
option httplog
option dontlognull
option http-server-close
option forwardfor except 127.0.0.0/8
option redispatch
retries 3
timeout http-request 10s
timeout queue 30s
timeout connect 10s
timeout client 1m
timeout server 1m
timeout http-keep-alive 10s
timeout check 10s
maxconn 30000
listen stats 192.168.0.8:80
mode http
log global
maxconn 10
clitimeout 100s
srvtimeout 100s
contimeout 100s
timeout queue 100s
stats enable
stats hide-version
stats refresh 30s
stats show-node
stats auth admin:password
stats uri /haproxy?stats
frontend M_Apps
bind 192.168.0.8:80
default_backend M_Apps_GW
backend M_Apps_GW
balance roundrobin
server web1 192.168.0.5:80 check
server web2 192.168.0.6:80 check
frontend POS_Apps
bind 192.168.0.8:8080
default_backend POS_GW
backend POS_GW
balance roundrobin
server web1 192.168.0.9:8080 check
server web2 192.168.0.10:8080 check
What are you getting on browser?
I don’t want to show ha-proxy stats on HTTP protocol, I wanted to have it with HTTPS only.
What is the steps to configure this ?
stats page is not opening
also disabled selinux
this is my configuration file
listen stats 10.0.0.128:1936
mode http
log global
maxconn 10
clitimeout 100s
srvtimeout 100s
contimeout 100s
timeout queue 100s
stats enable
stats hide-version
stats refresh 30s
stats show-node
stats auth haproxy:redhat
stats uri /haproxy?stats
# [HTTP Site Configuration]
listen http_web 10.0.0.128:80
mode http
balance roundrobin # Load Balancing algorithm
option httpchk
option forwardfor
server server1 10.0.0.130:80 weight 1 maxconn 512 check
server server2 10.0.0.131:80 weight 1 maxconn 512 check
Hi CHETAN,
You must check the haproxy version, or you can use this,
#view on UI
listen stats
bind :1936
mode http
log global
maxconn 10
stats enable
stats hide-version
stats refresh 30s
stats show-node
stats auth hadproxy:password
stats uri /haproxy?stats
Finally, restart the haproxy server.