Apache Kafka is a distributed streaming platform. It is useful for building real-time streaming data pipelines to get data between the systems or applications. Another useful feature is real-time streaming applications that can transform streams of data or react to a stream of data.
This tutorial will help you to install Apache Kafka on Ubuntu 18.04, and Ubuntu 16.04 Linux systems.
Step 1 – Install Java
Apache Kafka required Java to run. You must have java installed on your system. Execute the below command to install default OpenJDK on your system from the official PPA’s. You can also install the specific version of from here.
sudo apt updatesudo apt install default-jdk
Step 2 – Download Apache Kafka
Download the Apache Kafka binary files from its official download website. You can also select any nearby mirror to download.
wget https://dlcdn.apache.org/kafka/3.2.0/kafka_2.13-3.2.0.tgz
Then extract the archive file
tar xzf kafka_2.13-3.2.0.tgzsudo mv kafka_2.13-3.2.0 /usr/local/kafka
Step 3 – Setup Kafka Systemd Unit Files
Next, create systemd unit files for the Zookeeper and Kafka service. This will help to manage Kafka services to start/stop using the systemctl command.
First, create systemd unit file for Zookeeper with below command:
sudo vim /etc/systemd/system/zookeeper.service
Add below content:
[Unit]
Description=Apache Zookeeper server
Documentation=http://zookeeper.apache.org
Requires=network.target remote-fs.target
After=network.target remote-fs.target

[Service]
Type=simple
ExecStart=/usr/local/kafka/bin/zookeeper-server-start.sh /usr/local/kafka/config/zookeeper.properties
ExecStop=/usr/local/kafka/bin/zookeeper-server-stop.sh
Restart=on-abnormal

[Install]
WantedBy=multi-user.target
Save the file and close it.
Next, to create a Kafka systemd unit file using the following command:
sudo vim /etc/systemd/system/kafka.service
Add the below content. Make sure to set the correct JAVA_HOME path as per the Java installed on your system.
[Unit]
Description=Apache Kafka Server
Documentation=http://kafka.apache.org/documentation.html
Requires=zookeeper.service

[Service]
Type=simple
Environment="JAVA_HOME=/usr/lib/jvm/java-1.11.0-openjdk-amd64"
ExecStart=/usr/local/kafka/bin/kafka-server-start.sh /usr/local/kafka/config/server.properties
ExecStop=/usr/local/kafka/bin/kafka-server-stop.sh

[Install]
WantedBy=multi-user.target
Save the file and close.
Reload the systemd daemon to apply new changes.
systemctl daemon-reload
Step 4 – Start Kafka Server
Kafka required ZooKeeper so first, start a ZooKeeper server on your system. You can use the script available with Kafka to get start a single-node ZooKeeper instance.
sudo systemctl start zookeeper
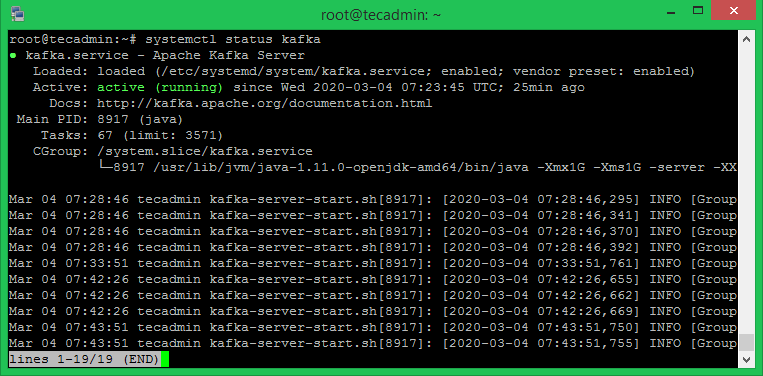
Now start the Kafka server and view the running status:
sudo systemctl start kafkasudo systemctl status kafka
All done. The Kafka installation has been successfully completed. This part of this tutorial will help you to work with the Kafka server.
Step 5 – Create a Topic in Kafka
Kafka provides multiple pre-built shell script to work on it. First, create a topic named “testTopic” with a single partition with single replica:
cd /usr/local/kafkabin/kafka-topics.sh --create --bootstrap-server localhost:9092 --replication-factor 1 --partitions 1 --topic testTopicCreated topic testTopic.
The replication factor describes how many copies of data will be created. As we are running with a single instance keep this value 1.
Set the partition options as the number of brokers you want your data to be split between. As we are running with a single broker keep this value 1.
You can create multiple topics by running the same command as above. After that, you can see the created topics on Kafka by the running below command:
bin/kafka-topics.sh --list --zookeeper localhost:9092

testTopic
TecAdminTutorial1
TecAdminTutorial2
Alternatively, instead of manually creating topics you can also configure your brokers to auto-create topics when a non-existent topic is published to.
Step 6 – Send Messages to Kafka
The “producer” is the process responsible for put data into our Kafka. The Kafka comes with a command-line client that will take input from a file or from standard input and send it out as messages to the Kafka cluster. The default Kafka sends each line as a separate message.
Let’s run the producer and then type a few messages into the console to send to the server.
bin/kafka-console-producer.sh --broker-list localhost:9092 --topic testTopic

>Welcome to kafka
>This is my first topic
>
You can exit this command or keep this terminal running for further testing. Now open a new terminal to the Kafka consumer process on the next step.
Step 7 – Using Kafka Consumer
Kafka also has a command-line consumer to read data from the Kafka cluster and display messages to standard output.
bin/kafka-console-consumer.sh --bootstrap-server localhost:9092 --topic testTopic --from-beginning

Welcome to kafka
This is my first topic
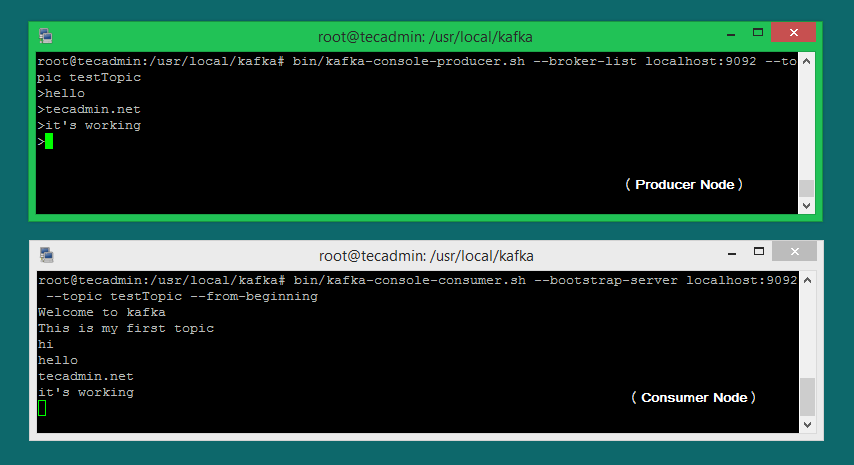
Now, If you have still running Kafka producer (Step #6) in another terminal. Just type some text on that producer terminal. it will immediately visible on consumer terminal. See the below screenshot of Kafka producer and consumer in working:
Conclusion
You have successfully installed and configured the Kafka service on your Ubuntu Linux machine.


24 Comments
Please updated Step 5 – Create a Topic in Kafka
To => ./kafka-topics.sh –create –topic test-topic –bootstrap-server localhost:9092 –replication-factor 1 –partitions 1
Bcoz: Newer versions(2.2 and above) will support this –zookeeper string.
Nice, Do you have a tut for the latest version?
Perfect. Works !!
Thanks !!
http://www-us.apache.org/dist/kafka/2.7.0/kafka_2.13-2.7.0.tgz no longer works. Try http://www.apache.org/dist/kafka/2.7.0/kafka_2.13-2.7.0.tgz instead.
Thanks James, I have updated the tutorial accordingly.
In the kafka service file if we edit value of JAVA_HOME according to our machine, we don’t need to download default jdk
Nice job. 100% smooth on Ubuntu 20.04. Now, to start digging in! Thank you.
It save me a lot of time .The best tutorial
One of the best short tutorials ever
Wonderful tutorial. Thanks for Sharing.
Thank you very much.
Great work
Dear Rahul: I obtain this message in the producer console when i write Hello.
[2020-10-11 15:41:44,845] WARN [Producer clientId=console-producer] Error while fetching metadata with correlation id 3 : {testTopíc=INVALID_TOPIC_EXCEPTION} (org.apache.kafka.clients.NetworkClient)
[2020-10-11 15:41:44,846] ERROR [Producer clientId=console-producer] Metadata response reported invalid topics [testTopíc] (org.apache.kafka.clients.Metadata)
[2020-10-11 15:41:44,848] ERROR Error when sending message to topic testTopíc with key: null, value: 4 bytes with error: (org.apache.kafka.clients.producer.internals.ErrorLoggingCallback)
org.apache.kafka.common.errors.InvalidTopicException: Invalid topics: [testTopíc]
Cant you help me?
Bets …
Works with ubuntu 20 thx
Thank you, although the title is a bit misleading. you are not actually installing Kafka, simply downloading and running the kafka script in an active console window. As soon as you close the window, the server will stop.
No he is not. He started kafka service. You can enable it to run on startup.
Thanks for taking time to do this. Very Simple, Neat and Intutive !!
Awesome Post brother… really helpful.
Thanks Rahul , it helps to start from scratch … like to collaborate in future 🙂
Thanks so much. Works great!
Wow. Just got it sweet. Works well in Ubuntu 18.04
Thank you for the detailed information, It is working in Ubuntu 18.04.
Hi, is this guide valid also for Centos OS? Thank you