Hadoop is a free, open-source and Java-based software framework used for storage and processing of large datasets on clusters of machines. It uses HDFS to store its data and process these data using MapReduce. It is an ecosystem of Big Data tools that are primarily used for data mining and machine learning. It has four major components such as Hadoop Common, HDFS, YARN, and MapReduce.
In this guide, we will explain how to install Apache Hadoop on RHEL/CentOS 8.
Step 1 – Disable SELinux
Before starting, it is a good idea to disable the SELinux in your system.
To disable SELinux, open the /etc/selinux/config file:
nano /etc/selinux/config
Change the following line:
SELINUX=disabled
Save the file when you are finished. Next, restart your system to apply the SELinux changes.
Step 2 – Install Java
Hadoop is written in Java and supports only Java version 8. You can install OpenJDK 8 and ant using DNF command as shown below:
dnf install java-1.8.0-openjdk ant -y
Once installed, verify the installed version of Java with the following command:
java -version
You should get the following output:
openjdk version "1.8.0_232"
OpenJDK Runtime Environment (build 1.8.0_232-b09)
OpenJDK 64-Bit Server VM (build 25.232-b09, mixed mode)
Step 3 – Create a Hadoop User
It is a good idea to create a separate user to run Hadoop for security reasons.
Run the following command to create a new user with name hadoop:
useradd hadoop
Next, set the password for this user with the following command:
passwd hadoop
Provide and confirm the new password as shown below:
Changing password for user hadoop.
New password:
Retype new password:
passwd: all authentication tokens updated successfully.
Step 4 – Configure SSH Key-based Authentication
Next, you will need to configure passwordless SSH authentication for the local system.
First, change the user to hadoop with the following command:
su - hadoop
Next, run the following command to generate Public and Private Key Pairs:
ssh-keygen -t rsa
You will be asked to enter the filename. Just press Enter to complete the process:
Generating public/private rsa key pair.
Enter file in which to save the key (/home/hadoop/.ssh/id_rsa):
Created directory '/home/hadoop/.ssh'.
Enter passphrase (empty for no passphrase):
Enter same passphrase again:
Your identification has been saved in /home/hadoop/.ssh/id_rsa.
Your public key has been saved in /home/hadoop/.ssh/id_rsa.pub.
The key fingerprint is:
SHA256:a/og+N3cNBssyE1ulKK95gys0POOC0dvj+Yh1dfZpf8 hadoop@centos8
The key's randomart image is:
+---[RSA 2048]----+
|                 |
|                 |
|              .  |
|     .   o o o   |
|  . . o S o o    |
| o = + O o   .   |
|o * O = B =   .  |
| + O.O.O + +   . |
|  +=*oB.+ o     E|
+----[SHA256]-----+
Next, append the generated public keys from id_rsa.pub to authorized_keys and set proper permission:
cat ~/.ssh/id_rsa.pub >> ~/.ssh/authorized_keys
chmod 640 ~/.ssh/authorized_keys
Next, verify the passwordless SSH authentication with the following command:
ssh localhost
You will be asked to authenticate hosts by adding RSA keys to known hosts. Type yes and hit Enter to authenticate the localhost:
The authenticity of host 'localhost (::1)' can't be established.
ECDSA key fingerprint is SHA256:0YR1kDGu44AKg43PHn2gEnUzSvRjBBPjAT3Bwrdr3mw.
Are you sure you want to continue connecting (yes/no)? yes
Warning: Permanently added 'localhost' (ECDSA) to the list of known hosts.
Activate the web console with: systemctl enable --now cockpit.socket

Last login: Sat Feb  1 02:48:55 2020
[hadoop@centos8 ~]$
Step 5 – Install Hadoop
First, change the user to hadoop with the following command:
su - hadoop
Next, download the latest version of Hadoop using the wget command:
wget http://apachemirror.wuchna.com/hadoop/common/hadoop-3.2.1/hadoop-3.2.1.tar.gz
Once downloaded, extract the downloaded file:
tar -xvzf hadoop-3.2.1.tar.gz
Next, rename the extracted directory to hadoop:
mv hadoop-3.2.1 hadoop
Next, you will need to configure Hadoop and Java Environment Variables on your system.
Open the ~/.bashrc file in your favorite text editor:
nano ~/.bashrc
Append the following lines:
export JAVA_HOME=/usr/lib/jvm/jre-1.8.0-openjdk-1.8.0.232.b09-2.el8_1.x86_64/
export HADOOP_HOME=/home/hadoop/hadoop
export HADOOP_INSTALL=$HADOOP_HOME
export HADOOP_MAPRED_HOME=$HADOOP_HOME
export HADOOP_COMMON_HOME=$HADOOP_HOME
export HADOOP_HDFS_HOME=$HADOOP_HOME
export HADOOP_YARN_HOME=$HADOOP_HOME
export HADOOP_COMMON_LIB_NATIVE_DIR=$HADOOP_HOME/lib/native
export PATH=$PATH:$HADOOP_HOME/sbin:$HADOOP_HOME/bin
export HADOOP_OPTS="-Djava.library.path=$HADOOP_HOME/lib/native"
Save and close the file. Then, activate the environment variables with the following command:
source ~/.bashrc
Next, open the Hadoop environment variable file:
nano $HADOOP_HOME/etc/hadoop/hadoop-env.sh
Update the JAVA_HOME variable as per your Java installation path:
export JAVA_HOME=/usr/lib/jvm/jre-1.8.0-openjdk-1.8.0.232.b09-2.el8_1.x86_64/
Save and close the file when you are finished.
Step 6 – Configure Hadoop
First, you will need to create the namenode and datanode directories inside Hadoop home directory:
Run the following command to create both directories:
mkdir -p ~/hadoopdata/hdfs/namenode
mkdir -p ~/hadoopdata/hdfs/datanode
Next, edit the core-site.xml file and update with your system hostname:
nano $HADOOP_HOME/etc/hadoop/core-site.xml
Change the following name as per your system hostname:
1 2 3 4 5 6 | <configuration> <property> <name>fs.defaultFS</name> <value>hdfs://hadoop.tecadmin.com:9000</value> </property> </configuration> |
Save and close the file. Then, edit the hdfs-site.xml file:
nano $HADOOP_HOME/etc/hadoop/hdfs-site.xml
Change the NameNode and DataNode directory path as shown below:
1 2 3 4 5 6 7 8 9 10 11 12 13 14 15 16 17 | <configuration> <property> <name>dfs.replication</name> <value>1</value> </property> <property> <name>dfs.name.dir</name> <value>file:///home/hadoop/hadoopdata/hdfs/namenode</value> </property> <property> <name>dfs.data.dir</name> <value>file:///home/hadoop/hadoopdata/hdfs/datanode</value> </property> </configuration> |
Save and close the file. Then, edit the mapred-site.xml file:
nano $HADOOP_HOME/etc/hadoop/mapred-site.xml
Make the following changes:
1 2 3 4 5 6 | <configuration> <property> <name>mapreduce.framework.name</name> <value>yarn</value> </property> </configuration> |
Save and close the file. Then, edit the yarn-site.xml file:
nano $HADOOP_HOME/etc/hadoop/yarn-site.xml
Make the following changes:
1 2 3 4 5 6 | <configuration> <property> <name>yarn.nodemanager.aux-services</name> <value>mapreduce_shuffle</value> </property> </configuration> |
Save and close the file when you are finished.
Step 7 – Start Hadoop Cluster
Before starting the Hadoop cluster. You will need to format the Namenode as a hadoop user.
Run the following command to format the hadoop Namenode:
hdfs namenode -format
You should get the following output:
2020-02-05 03:10:40,380 INFO namenode.NNStorageRetentionManager: Going to retain 1 images with txid >= 0
2020-02-05 03:10:40,389 INFO namenode.FSImage: FSImageSaver clean checkpoint: txid=0 when meet shutdown.
2020-02-05 03:10:40,389 INFO namenode.NameNode: SHUTDOWN_MSG:
/************************************************************
SHUTDOWN_MSG: Shutting down NameNode at hadoop.tecadmin.com/45.58.38.202
************************************************************/
After formating the Namenode, run the following command to start the hadoop cluster:
start-dfs.sh
Once the HDFS started successfully, you should get the following output:
Starting namenodes on [hadoop.tecadmin.com]
hadoop.tecadmin.com: Warning: Permanently added 'hadoop.tecadmin.com,fe80::200:2dff:fe3a:26ca%eth0' (ECDSA) to the list of known hosts.
Starting datanodes
Starting secondary namenodes [hadoop.tecadmin.com]
Next, start the YARN service as shown below:
start-yarn.sh
You should get the following output:
Starting resourcemanager
Starting nodemanagers
You can now check the status of all Hadoop services using the jps command:
jps
You should see all the running services in the following output:
7987 DataNode
9606 Jps
8183 SecondaryNameNode
8570 NodeManager
8445 ResourceManager
7870 NameNode
Step 8 – Configure Firewall
Hadoop is now started and listening on port 9870 and 8088. Next, you will need to allow these ports through the firewall.
Run the following command to allow Hadoop connections through the firewall:
firewall-cmd --permanent --add-port=9870/tcp
firewall-cmd --permanent --add-port=8088/tcp
Next, reload the firewalld service to apply the changes:
firewall-cmd --reload
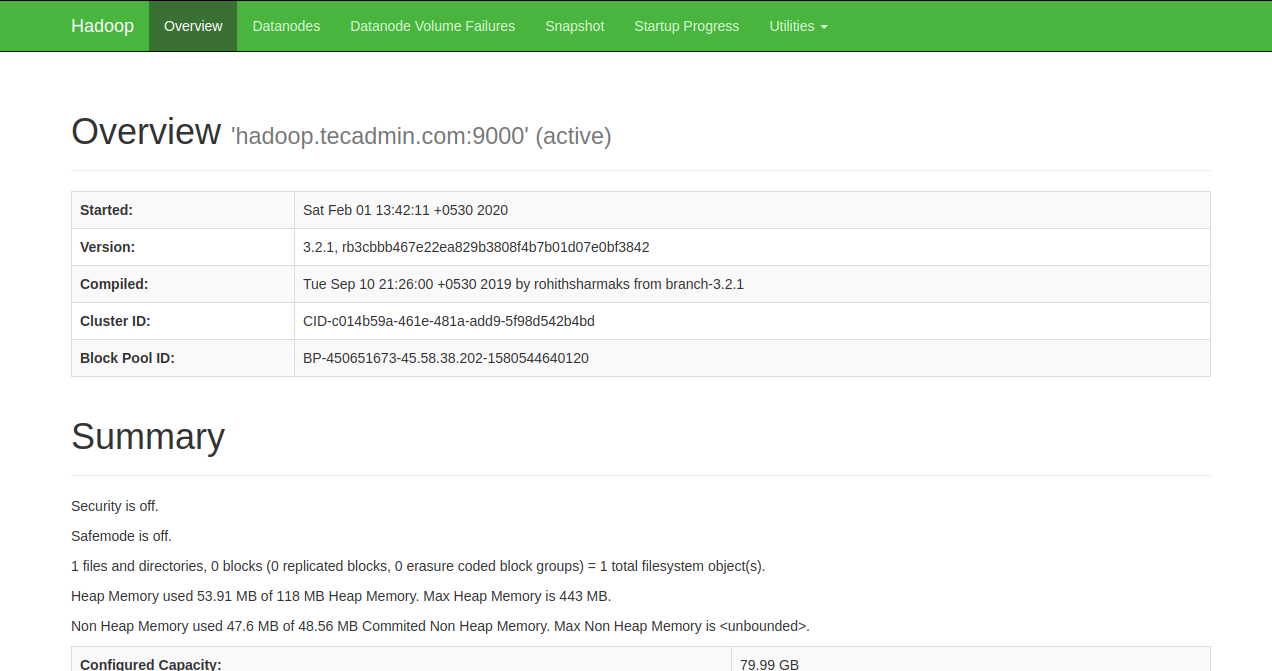
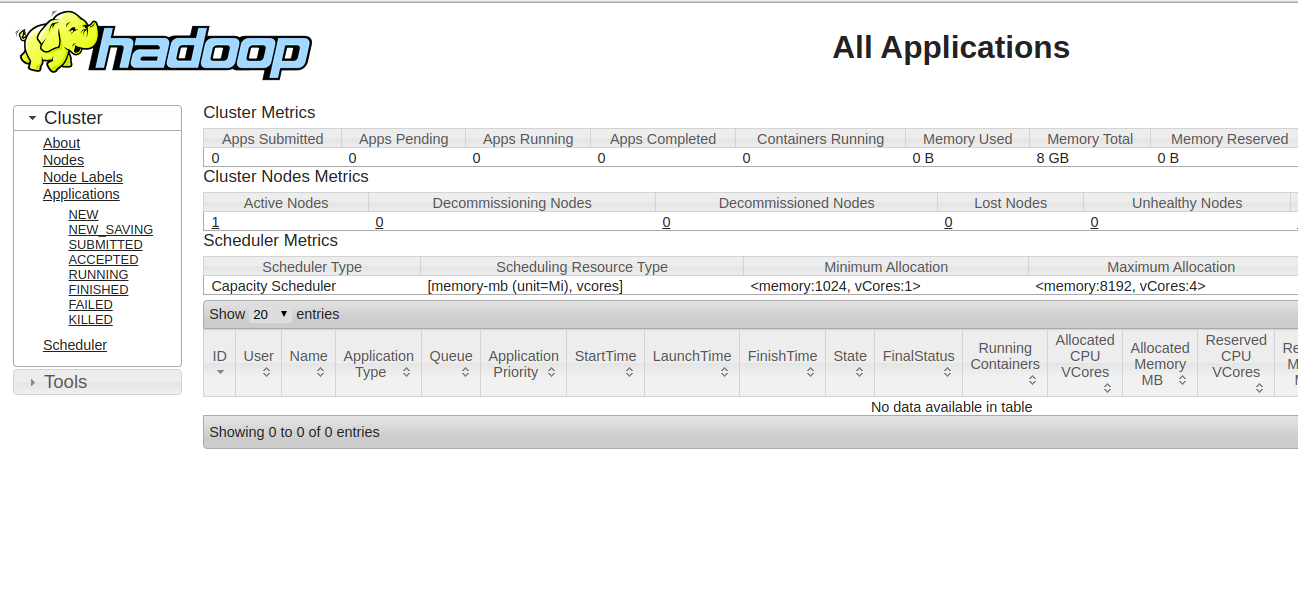
Step 9 – Access Hadoop Namenode and Resource Manager
To access the Namenode, open your web browser and visit the URL http://your-server-ip:9870. You should see the following screen:
To access the Resource Manage, open your web browser and visit the URL http://your-server-ip:8088. You should see the following screen:
Step 10 – Verify the Hadoop Cluster
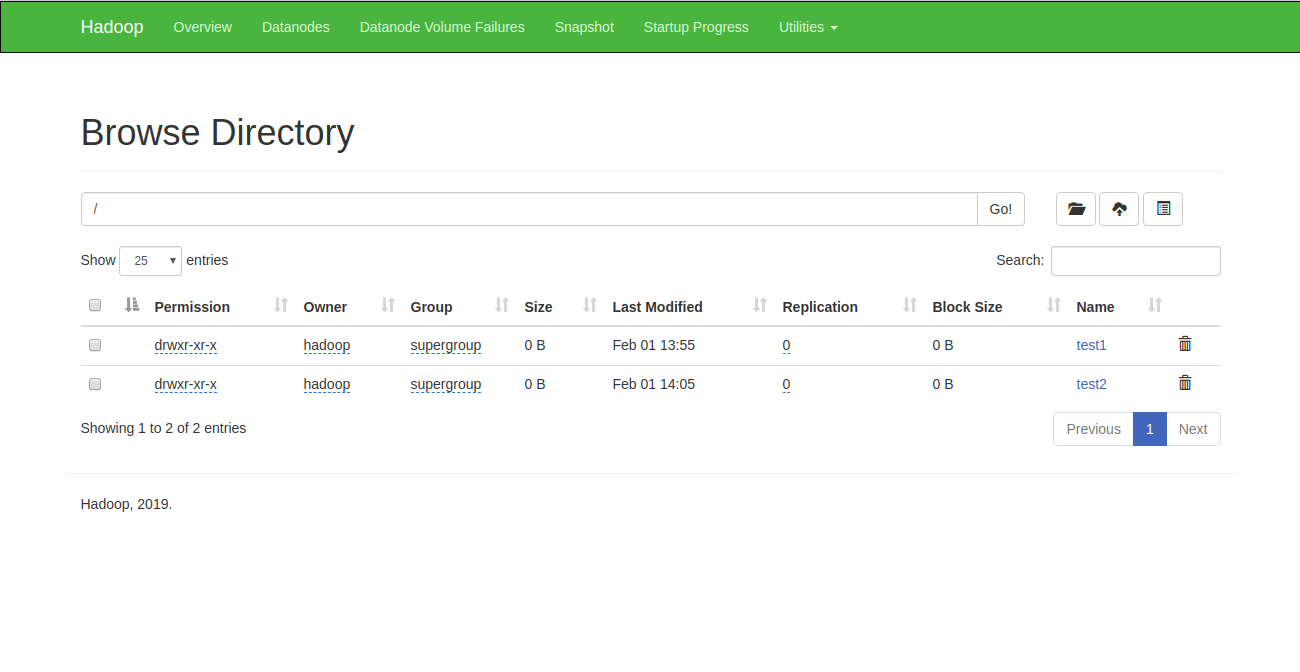
At this point, the Hadoop cluster is installed and configured. Next, we will create some directories in HDFS filesystem to test the Hadoop.
Let’s create some directory in the HDFS filesystem using the following command:
hdfs dfs -mkdir /test1
hdfs dfs -mkdir /test2
Next, run the following command to list the above directory:
hdfs dfs -ls /
You should get the following output:
Found 2 items
drwxr-xr-x   - hadoop supergroup          0 2020-02-05 03:25 /test1
drwxr-xr-x   - hadoop supergroup          0 2020-02-05 03:35 /test2
You can also verify the above directory in the Hadoop Namenode web interface.
Go to the Namenode web interface, click on the Utilities => Browse the file system. You should see your directories which you have created earlier in the following screen:
Step 11 – Stop Hadoop Cluster
You can also stop the Hadoop Namenode and Yarn service any time by running the stop-dfs.sh and stop-yarn.sh script as a Hadoop user.
To stop the Hadoop Namenode service, run the following command as a hadoop user:
stop-dfs.sh
To stop the Hadoop Resource Manager service, run the following command:
stop-yarn.sh
Conclusion
In the above tutorial, you learned how to set up the Hadoop single node cluster on CentOS 8. I hope you have now enough knowledge to install the Hadoop in the production environment.
")

12 Comments
Everything works perfectly with the hadoop user.
But if I change the user, the command to view the folders created in hdfs does not identify me.
How can I enable other users to see the hdfs folders?
Environment variables are set for hadoop user only.
Good article to setup hadoop
It’s a good guide, but some things are wrong.
Like in the hdfs-default.xml:
Where it is not
dfs.replication
1
dfs.name.dir
file:///home/hadoop/hadoopdata/hdfs/namenode
dfs.data.dir
file:///home/hadoop/hadoopdata/hdfs/datanode
But
dfs.replication
1
dfs.namenode.name.dir
file:///home/hadoop/hadoopdata/hdfs/namenode
dfs.datatanode.data.dir
file:///home/hadoop/hadoopdata/hdfs/datanode
Thanks, I missed out this thing while installing, Previously it was getting error while writing in Hadoop file.
Really helpful article. But i got some error. I am using RHEL 8 .
When i type ‘ jps ‘ = command not found error was shown.
When i start dfs.sh, and yarn, below error was shown and permission denied.
Starting namenodes on [hadoop.tecadmin.com]
hadoop.tecadmin.com: ssh: connect to host hadoop.tecadmin.com port 22: Connection timed out
Starting datanodes
localhost: hadoop@localhost: Permission denied (publickey,gssapi-keyex,gssapi-with-mic,password).
Starting secondary namenodes [localhost.localdomain]
localhost.localdomain: [email protected]: Permission denied (publickey,gssapi-keyex,gssapi-with-mic,password).
How can i solve? thanks
Hi, when I type $jps. the command outputs are :
23313 SecondaryNameNode
25570 NodeManager
23014 DataNode
38670 Jps
25407 ResourceManager
I don’t have the NameNode, where is my error?
excellent, working perfectly. Thanks
Any author starting with “disable SELinux on your system” … hard no.
after typing “hdfs namenode -format”
i get “bash:hdfs command not found…”
help me
Really good article, everything works as described here.
“it is a good idea to disable the SELinux in your system….” stop reading…