As a Java developer, you may need to install Java on your CentOS/RHEL 8 server. Oracle Java 8 and Java 11 required a subscription to download and install. So we use OpenJDK for this installation. Installing Java can be a tricky process but you don’t have to worry because today I’m going to show you the easiest way to install Java on CentOS/RHEL 8!
Step 1: Search Java Packages
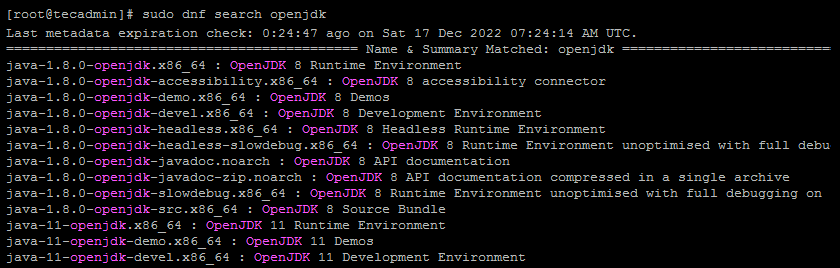
The OpenJDK rpm packages are available under the AppStream repository. Use the following command to search available Java packages under configured DNF repositories.
sudo dnf search openjdk
Step 2: Install Java on CentOS 8
The first step in installing Java on CentOS/RHEL 8 is to download the Java Development Kit (JDK). The JDK is the most comprehensive version of Java and contains all the necessary tools for developing Java applications.
Now, use one of the following commands to install the required Java version on your CentOS 8 and RHEL 8 Linux systems. You can also install both Java versions on any system and use them as per your requirements. During the last update of this tutorial Java 1.8, Java 11, Java 17, and Java 19 (latest) version were available for installation. You can choose any of the available Java versions to install on your CentOS 8 or RHEL 8 systems.
To download the JDK on CentOS/RHEL 8, you can use the command line:
- Install Java 11: which is the current popular version among developers.
sudo dnf install java-11-openjdk - Install Java 8: which is still being used by large number of applications.
sudo dnf install java-1.8.0-openjdk - Install Java 17: which is the current LTS release.
sudo dnf install java-17-openjdk - Install Latest Java: This will install the latest available Java version on your system.
sudo dnf install java-latest-openjdk
You can also install the Java Runtime Environment (JRE) if you don’t need the full JDK. The JRE is a stripped-down version of Java that is used to run Java applications. To install the JRE, you can use the same command as you used to install the JDK but with the “-jre” flag:
sudo dnf install java-1.8.0-openjdk-jre
Step 3: Check Java Version
I have installed both Java versions for this article, First I installed Java 11 then installed Java 8 on my CentOS 8 system. After you have installed the JDK or JRE, you can check the version of Java that has been installed by typing:
java -version

openjdk version "1.8.0_222"
OpenJDK Runtime Environment (build 1.8.0_222-b10)
OpenJDK 64-Bit Server VM (build 25.222-b10, mixed mode)
This will print the version of Java that has been installed on your server.
Step 4: Setting Up Java Environment Variables
Once you’ve installed Java on your server, you need to set up the Java Environment Variables. This will ensure that all the Java applications you run will be able to find the correct version of Java.
To set up your environment variables, you need to edit the “~/.bash_profile” file:
nano ~/.bash_profile
Once you’ve opened the file, you need to add the following lines at the end of the file:
export JAVA_HOME=/usr/lib/jvm/java-1.8.0-openjdk
export PATH=$PATH:$JAVA_HOME/bin
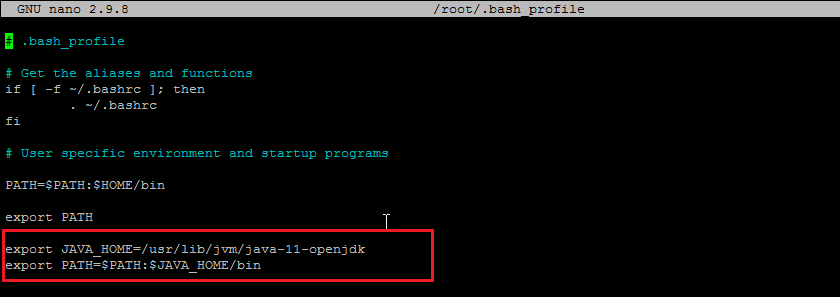
This will set the JAVA_HOME environment variable and add the Java binary directory to the PATH variable.
After you’ve saved the changes to the bash_profile file, you need to reload the file:
source ~/.bash_profile
Now, you can check that the environment variables have been set correctly by typing:
echo $JAVA_HOMEecho $PATH
This will print the values of the JAVA_HOME and PATH environment variables.

Step 5: Switch Between Java Versions
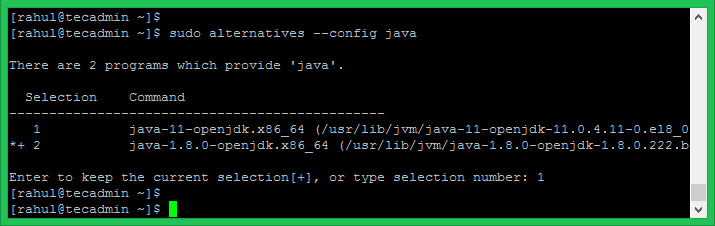
If you need to manage multiple versions of Java on your server, you can use the alternatives command to switch between different versions.
To list the available Java versions, you can use the following command:
sudo alternatives --config java
A list of installed Java versions will be displayed. Select the appropriate Java version number and press enter. In my case, Java 8 is currently active so I entered 1 in the selection to change it to Java 11.
After changing again check the current active Java version.
java -version

openjdk version "11.0.4" 2019-07-16 LTS
OpenJDK Runtime Environment 18.9 (build 11.0.4+11-LTS)
OpenJDK 64-Bit Server VM 18.9 (build 11.0.4+11-LTS, mixed mode, sharing)
Once you updated the Java version, make sure to update ~/.bash_profile to set JAVA_HOME and PATH environment variables.
Conclusion
In this blog post, I’ve shown you the easiest way to install Java on CentOS/RHEL 8. I’ve also shown you how to set up the Java environment variables and how to manage multiple Java versions on your server. So, if you need to install Java on your server, you now know how to do it the easy way!
If you have any questions or feedback, feel free to leave a comment down below. I’d love to hear from you!
If you’re looking for more tips on how to install and manage Java on your server, make sure to check out our other blog posts. We have a wealth of knowledge about Java and we’re always happy to help!
