Generally, the host manager uses the separate system for each PHP version application deployment. Which increases the hosting cost. Some of the host managers are using Docker to run multiple PHP version on the single server. Also, most of you are aware of the configuration. Might be some of the system administrators are not aware of this. This tutorial will help you to install multiple PHP version with Apache on Debian 11, Debian 10, and Debian 9 systems without switching PHP versions.
This tutorial describes the installation and configuration of two VirtualHost on Apache with separate PHP versions. First VirtualHost will work with PHP 5.6 and another VirtualHost will run with PHP 7.2. So just go through this tutorial. You can also use more than two PHP versions with Apache as required but this tutorial covers two only.
PHP Installation
For the installation of PHP versions, we use the PPA maintained here. Use the below couple of commands to add the PPA on your Debian system.
sudo apt install ca-certificates apt-transport-https
wget -q https://packages.sury.org/php/apt.gpg -O- | sudo apt-key add -
echo "deb https://packages.sury.org/php/ stretch main" | sudo tee /etc/apt/sources.list.d/php.list
This tutorial uses PHP 5.6 and PHP 7.2 to configure with Apache web server. To use the multiple PHP versions, we will use PHP FPM and FastCGI. Run the following commands to install PHP and FPM on the Debian system.
apt update
sudo apt install php5.6 php5.6-fpm
sudo apt install php7.2 php7.2-fpm
After installation, php-fpm services will be started automatically. Use the following commands to make sure both services are running.
sudo systemctl status php5.6-fpm
sudo systemctl status php7.2-fpm
Apache Installation
Install Apache web server from the official repository. Launch terminal on your system or login with ssh for remote systems. Execute the following commands to install the latest available version of Apache web server.
sudo apt update
sudo apt install apache2 libapache2-mod-fcgid
Apache Configuration
Now enable few modules required for the configuration of multiple PHP versions with Apache. These modules are necessary to integrate PHP FPM and FastCGI with Apache server.
sudo a2enmod actions fcgid alias proxy_fcgi
Now create two seprate directories on your system for both sites configuring on your system.
sudo mkdir /var/www/php56
sudo mkdir /var/www/php72
Now, create and index.php containing the phpinfo() function. This will help users to view and confirm, what PHP version is used by the VirtualHost.
echo " <?php phpinfo(); ?> " > /var/www/php56/index.phpecho " <?php phpinfo(); ?> " > /var/www/php72/index.php
Let’s start the creation of VirtualHost. Apache keeps all the VirtualHost configuration files under /etc/apache2/sites-available with the extension .conf. Create a file for the first virtual host and edit in your favorite text editor.
sudo vim /etc/apache2/sites-available/php56.example.com.conf
Add the following content. Make sure to use correct ServerName and directory path according to your setup. This website is configured to work with PHP 5.6.
1 2 3 4 5 6 7 8 9 10 11 12 13 | <VirtualHost *:80> ServerName php56.example.com DocumentRoot /var/www/php56 <Directory /var/www/php56> Options -Indexes +FollowSymLinks +MultiViews AllowOverride All Require all granted </Directory> <FilesMatch \.php$> # Apache 2.4.10+ can proxy to unix socket SetHandler "proxy:unix:/var/run/php/php5.6-fpm.sock|fcgi://localhost/" </FilesMatch> </VirtualHost> |
Similarly, create a second VirtualHost configuration file to work with PHP 7.2. Edit configuration file in text editor:
sudo vim /etc/apache2/sites-available/php72.example.com.conf
Add the following content to file with proper ServerName and DocumentRoot.
1 2 3 4 5 6 7 8 9 10 11 12 | <VirtualHost *:80> ServerName php72.example.com DocumentRoot /var/www/php72 <Directory /var/www/php72> Options -Indexes +FollowSymLinks +MultiViews AllowOverride All Require all granted </Directory> <FilesMatch \.php$> SetHandler "proxy:unix:/var/run/php/php7.2-fpm.sock|fcgi://localhost/" </FilesMatch> </VirtualHost> |
You both of the websites are configured now. But they are still not active. Apache keeps active sites under /etc/apache2/sites-enabled directory. You can simply create a symbolic link of config files to this directory or use below command to do the same.
sudo a2ensite php56.example.com
sudo a2ensite php72.example.com
After making all the changes restart Apache to reload new settings changes.
sudo systemctl restart apache2
Your setup has been completed now. Go to the next step to test your setup.
Test Setup
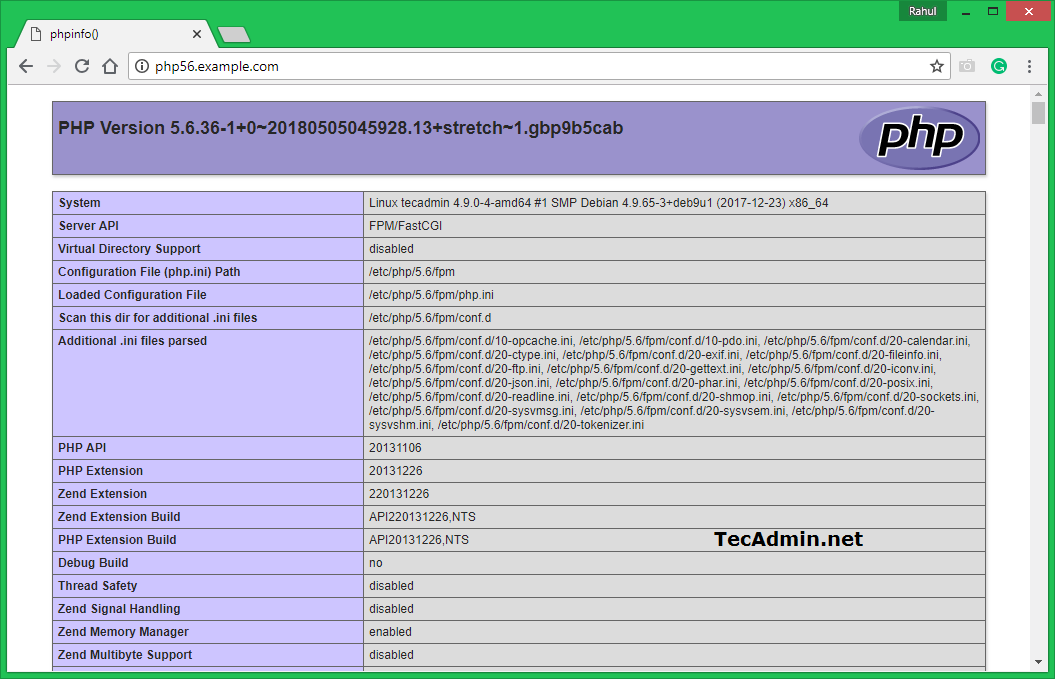
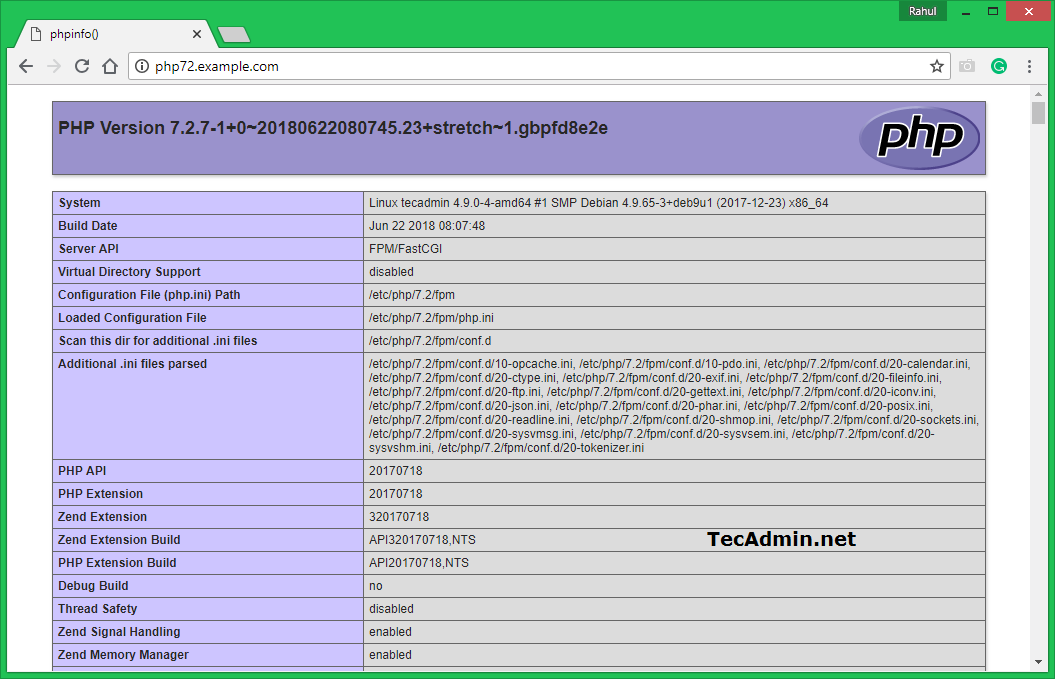
Open a web browser and visit both of the sites. You will see that php56.example.com shows the version PHP 5.6 and php72.example.com is showing the PHP 7.2 as the configuration.


14 Comments
Hi Rahul,
Thank you very much for this excellent tutorial !
It’s exactly what i’ve been looking for.
Cheers from Switzerland
Thanks,
it works perfectly compared to several other tries I made.
At least no pb with compils and config.
It works also with 7.3 on my Debian 🙂
See Ya man 🙂
Thank you so much, it works for me!
Thanks for this guide, works perfect for me on Debian 9. I have one site running 5.6 and my forum 7.2, Only thing I noticed was not mentioned was php modules for an example.
sudo apt install php5.6-cli php5.6-common php5.6-curl php5.6-mbstring php5.6-mysql php5.6-xml
sudo apt install php7.2-cli php7.2-common php7.2-curl php7.2-mbstring php7.2-mysql php7.2-xml
though from your tut this is not really needed just for a php.info page lol.
Hi there,
Thank you for sharing but it did not work.
I have been trying than on Debian 9.7 stretch with no success 🙁
Not Found
The requested URL /php56/index.php was not found on this server.
Thank you
wrong tutorial, i can’t find other php versions after adding repo…
i’m using.
apt search php | grep php
Hi Nurlan,
I have checked and found PHP 5.6, 7.1, 7.2 and 7.3 still available for Debian 9.
Thank you very much for this simple and effective tutorial: great
I try to connect from php56 vhost to mysql database and from php72 vhost but i can `t it. The basic php instruction are functioning but the mysql connect not. Why?
Please check if php-mysql package is installed and module enabled.
sudo apt install php7.2-mysql php5.6-mysql
Hi,
Thanks for the tutorial!
I have Debian 9 with PHP 7.0 already installed.
I added PHP 5.6 and 7.3 with the required extensions, everything is fine.
In Webmin, I have 2 MySQL servers (Ok ..)
But when I try to install WordPress 5.2.4 with PHP 7.3, I can not connect to MySQL. It’s the same with any script that connects to MySQL.
The MySQL user and password are Ok, for the hostname I tried several: localhost, 127.0. 0.1, server IP address etc .. but impossible to connect!
Any idea of where the problem may come from?
Thank you
Check if php-mysql extension is enabled for Apache?
Excellent.
Is there a way to let php7.0 be de default? I mean having nothing to configure for most site but those expected to run under php5.6?
sudo a2enconf php7.2-fpm
set 7.2 as default