Step 1 – Install PHP & MySQL
First of all, install PHP packages from Ondrej Apt repository on your system. Execute the following commands to install it.
sudo apt-get install python-software-properties
sudo add-apt-repository ppa:ondrej/php
sudo apt-get update
sudo apt-get install php7.3 php7.3-fpm  mysql-server php7.3-mysql
Step 2 – Install Nginx
Then install Nginx packages from the Nginx official Apt repository.
curl http://nginx.org/keys/nginx_signing.key | apt-key add -
echo "deb-src http://nginx.org/packages/mainline/ubuntu/ `lsb_release -cs` nginx"  >> /etc/apt/sources.list
echo "deb http://nginx.org/packages/mainline/ubuntu/ `lsb_release -cs` nginx" >> /etc/apt/sources.list
and now use following commands to install Nginx web server, PHP5 with PHP5-FPM and MySQL server.
sudo apt-get update
sudo apt-get install nginx
Step 3 — Configure PHP-FPM
PHP-FPM (FastCGI Process Manager) is an alternative PHP FastCGI implementation with some additional features. Set the listen parameter in /etc/php/7.3/fpm/pool.d/www.conf configuration file. Change 7.3 with your installed PHP version. You can find the current active PHP version by creating phpinfo file.
sudo nano /etc/php/7.3/fpm/pool.d/www.conf
Now make changes in the configuration file as below. Commend listen with socket file and enable it as service
;listen = /var/run/php5-fpm.sock
listen = 127.0.0.1:9000
Step 4 — Setup WordPress on Ubuntu
Download latest WordPress archive file from its official website using following command.
wget http://wordpress.org/latest.tar.gz
Extract archive in the document root of your domain and update permissions on files.
tar xzf latest.tar.gz
sudo mv wordpress /var/www/example.com
sudo chown -R apache.apache /var/www/example.com
sudo chmod -R 755 /var/www/example.com
Step 5 — Create MySQL DB and User
After extracting WordPress codebase, Let’s create a MySQL database and user account for configuring WordPress. Use the following set of command to do it
mysql -u root -p
Enter password:

mysql> CREATE DATABASE wp_db;
mysql> GRANT ALL ON wp_db.* to 'wp_user'@'localhost' IDENTIFIED BY 'password_';
mysql> FLUSH PRIVILEGES;
mysql> quit
Step 6 — Configure Nginx VirtualHost
Finally, do the configuration of Nginx server block (Virtual Host). For this example, we are creating a new configuration file for our domain example.com.
sudo nano /etc/nginx/conf.d/example.com.conf
and make changes as below.
server {
        listen   80;

        root /var/www/example.com;
        index index.php index.html;
        server_name  example.com www.example.com;

        location / {
                try_files $uri $uri/ /index.php?q=$request_uri;
        }

        error_page 404 /404.html;
        error_page 500 502 503 504 /50x.html;
        location = /50x.html {
              root /usr/share/nginx/www;
        }

        location ~ .php$ {
                try_files $uri =404;
                fastcgi_pass 127.0.0.1:9000;
                fastcgi_index index.php;
                fastcgi_param SCRIPT_FILENAME $document_root$fastcgi_script_name;
                include fastcgi_params;
        }
}
After installing all services on your system, start all required services.
sudo service nginx restart
sudo service php7.3-fpm restart
Step 7 — Start WordPress Web Installer
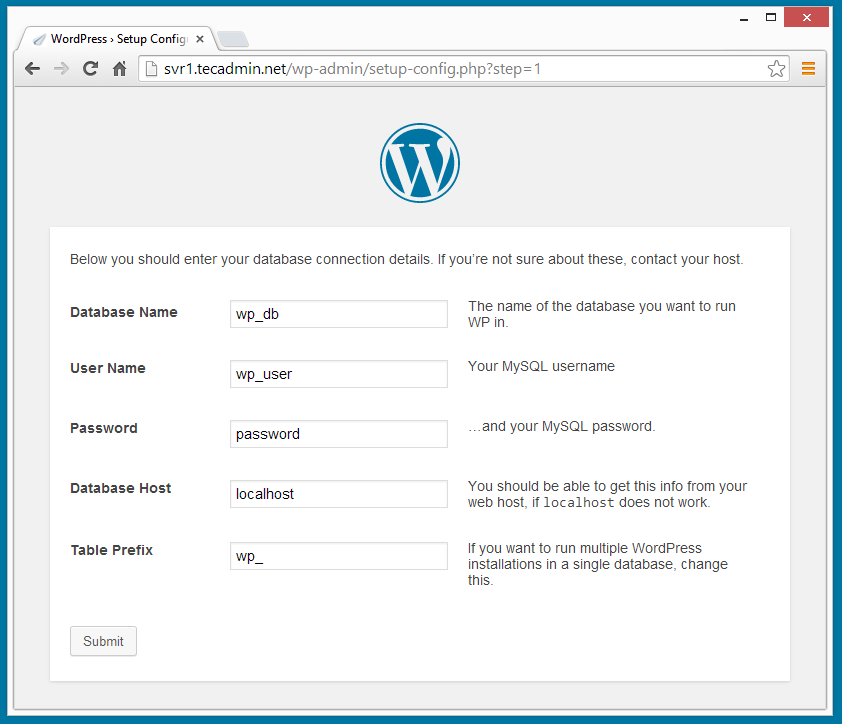
WordPress provides a web installer for easy to setup WordPress without editing files manually. After completing above steps just point your browser to your domain. Fill the database details and click “
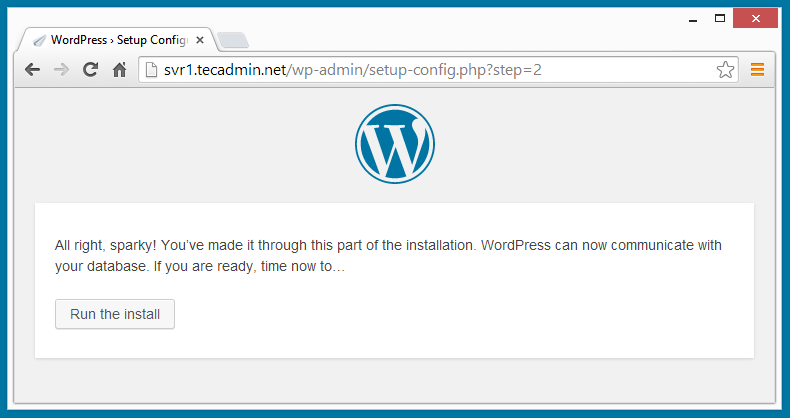
After submitting database details, click on “
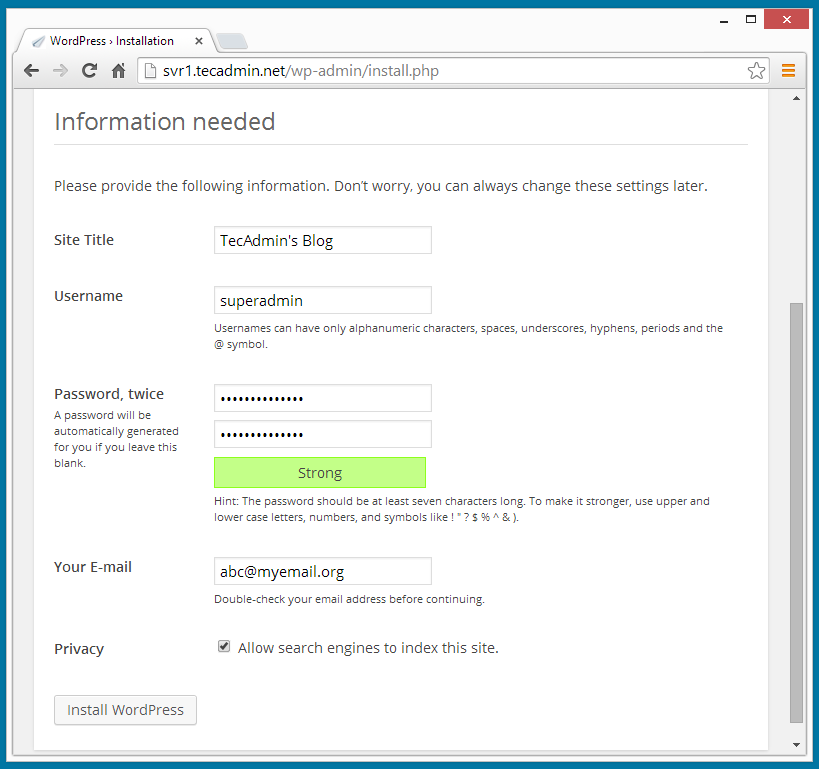
- Blog Title
- Username of admin account (for security do not use as “admin”)
- Admin password ( twice )
- Email ID
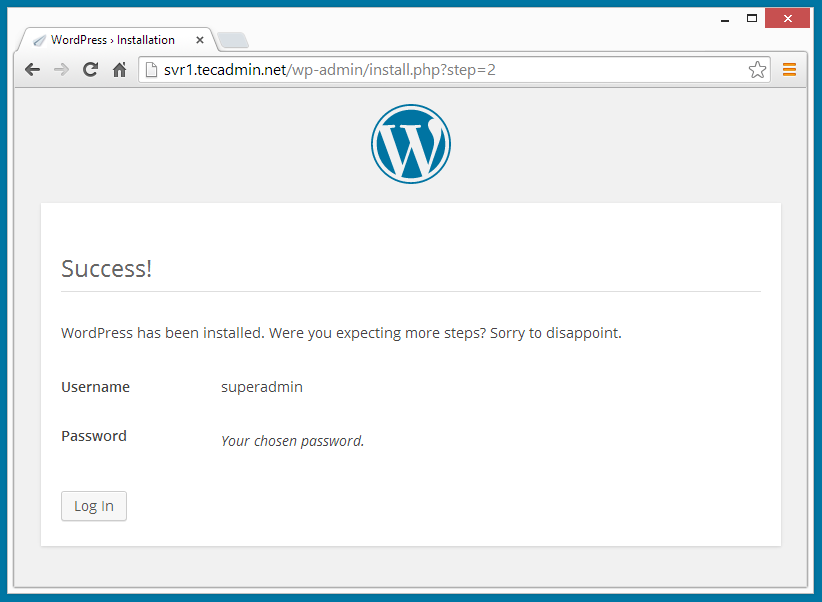
After completing above step, You have installed WordPress successfully, Now you will get WordPress success installation message.
2 Comments
Hi,
Thanks for posting such a great and informational article. However, i was wondering how the process will change if i have to setup a second website on the same server. Can you help me regarding this?
Thanks a lot…