Rsync (Remote Sync) is a command-line tool for synchronizing files between two Unix-based systems. Rsync can also be used on the same system to synchronize files between two directories. Rsync uses a smart algorithm to send only the differences between source files and existing files to the destination. This means it uses less data on the network to save bandwidth.
Rsync is usually used for backing up large amounts of data or transferring data between two computers. It supports syncing files from local to local, local to remote, and remote to local. However, it does not support remote to remote file syncing.
In this post, we will look at some common uses for the rsync command-line tool.
Syntax
rsync [OPTION...] SOURCE... [DESTINATION]
- SOURCE can be a local directory like “/opt/backup” or a remote location like “user@example.com:/opt/remotedir/”
- DESTINATION can be a local directory or a remote system directory
- Both SOURCE and DESTINATION can refer to a local directory.
- Only one of SOURCE or DESTINATION can be remote. You can’t use both as remote locations.
Rsync Command Options
Rsync offers many useful options that control its behavior and make it more flexible for synchronizing files. Below is a list of some frequently used Rsync command options:
| Option | Description |
|---|---|
-v, -vv, -vvv, --verbose | Use this for detailed logs. The more “v”, the more detail. |
-a, --archive | Commonly used option. It includes options to copy everything recursively, preserving file permissions, symbolic links, file ownership, and timestamps. |
-z, --compress | Transfer data in compressed format to save bandwidth. |
-h, --human-readable | Prints outputs in a human-readable format. |
--delete | Removes files on the destination that do not exist on the source. |
--exclude=PATTERN | Excludes files matching the given pattern. |
--include=PATTERN | Includes files matching the given pattern. |
Rsync Examples
Here are 12 practical examples of the Rsync command in Unix/Linux systems.
- Copy/Sync files and directories local-to-local
Rsync allows synchronizing files between directories on the local system. For example, you have backup files on your local machine under the /mnt/backup directory. You want to copy/sync all the files to a USB drive mounted on /mnt/disk1. Use the following command to synchronize all files and directories from /opt/backup to /mnt/disk1.
rsync -avhz /opt/backup /mnt/disk1/sending incremental file list backup/ backup/tecadmin.22Mar2022.sql backup/tecadmin.22Mar2022.tar.gz backup/tecadmin.23Mar2022.sql backup/tecadmin.23Mar2022.tar.gz sent 1.09G bytes received 96 bytes 23.39M bytes/sec total size is 1.47G speedup is 1.35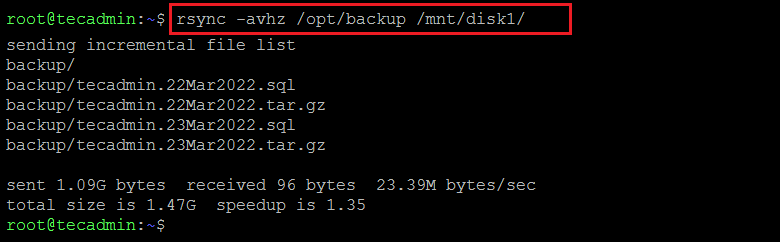
Copy/sync files and directories between two local directories - Copy/Sync files and directories local-to-remote
Using rsync, we can quickly copy/synchronize files from local to remote systems. For example, you need to transfer a website to a new server. Use the below command to copy all files from the local /var/www/html directory to the remote (192.168.1.100) systems /var/www/html directory.
rsync -avhz /var/www/html root@192.168.1.100:/var/www/html/The above command is helpful for a system administrator who copies files between two systems regularly.
- Copy/Sync files and directories remote-to-local
Rsync can also copy files from a remote directory to a local directory. For example, you need to copy all backup files stored under /backups directory on a remote system to the local /opt/backups directory.
rsync -avhz root@192.168.1.100:/backups /opt/backups - Using Rsync over SSH
Rsync connects to remote systems using the Rsync daemon directly via TCP. We can instruct rsync to use Secure shell (SSH) to connect to remote systems.
Use
-eoption to specify the remote shell. The below command will use ssh as a remote shell:rsync -avhz -e ssh /src root@192.168.1.100:/dest/If the SSH server on the destination is running on a non-standard port, use this tutorial to connect rsync over a non-standard port.
- Ignore files and directories that already exist on the destination
Use the Rsync command with
--ignore-existingoption to ignore all files that already exist on the destination. For example, you want to schedule a backup script to copy all files to the backup disk daily. In that case, you don’t want to copy all files again and again. This option will copy those files that are not available at the destination.rsync -avhz --ignore-existing /opt/backups /mnt/disk1 - Update file only if the source is newer
Use
--updateoption to update the file on remote only if there is a newer version is local. Rsync will create a file on the destination if it does not exist. Also, it will update the file on the destination if the local timestamp is newer than the remote system file.rsync --update -avhz /opt/backups /mnt/disk1/ - Remove file from source after sync
Use
--remove-source-filesoption to remove a file from the source after a successful transfer to the destination. For example, you need to schedule a backup of log files to the remote system. Also, you want to remove the log file from the local system after successfully copying it to the remote. This will help to free up disk space.rsync --remove-source-files -avhz /var/log root@192.168.1.100:/backup/logs/ - Exclude specific file or directory with Rsync
You can specify a file or pattern with the
--exclude=PATTERNoption to exclude it from rsync.rsync -avh --exclude '*.zip' --exclude '*.log' /src user@remote.host:/dest - Include Specific files with Rsync
The default Rsync includes all files under the source directory tree. Now, you need to include only specific files to synchronize to the destination.
Here you can specify--include=PATTERNto include specific files and exclude all files with*.rsync -avhz --include '*.jpg' --include '*.txt' --exclude '*' /src user@remote.host:/dest - Display Progress with Rsync
Use
--progressoption to display progress during the file transfer between source and destination with the rsync command.rsync -avh --progress /src user@remote.host:/dest - Change file permissions with Rsync
You can instruct Rsync to change the file’s owner and group owners on the destination. Use option
--chown=USER:GROUPwith Rsync to change file permissions.rsync -avh --chown=USER:GROUP /src user@remote.host:/destSimilarly, you can use the –chmod=CHMOD option to change file or directory permissions on the destination.
rsync -avh --chmod=755 /src user@remote.host:/dest - Rsync dry run only
Use
--dry-runoption to execute a dry run only. It will show you similar results as the original command but nothing will update on the destination. Basically, we can use this to check what Rsync will update before actually running it.rsync -avh --dry-run /src user@remote.host:/dest
Conclusion
Rsync is a great utility for transferring large amounts of data between two machines. You may also use Rsync to back up the entire system at a remote backup location. In this article, you have learned some practical Rsync command examples that are great for daily tasks.

1 Comment
This will not synchronize the files that were deleted… it is a bit more complicated than this.