Question: How to autorun a Python script using systemd. How to create own systemd service using Python script. How to configure Python script to start as systemd. How to manage Python service with systemctl?
`Systemd` is a system and service manager for Linux that allows you to manage and control services and daemons on your system. You can use Systemd to automate the execution of Python scripts by creating a Systemd service that runs the script at startup or on a schedule.
Using Systemd to automate Python scripts has several benefits, including the ability to start and stop the script as needed, to run the script in the background as a daemon, and to configure dependencies and runtime options.
Here’s a step-by-step guide on how to automate a Python script using Systemd:
Step 1 – Create Sample Python Application
Create a Python script that you want to automate. For example, let’s say you have a script named myscript.py that you want to run every hour.
sudo nano /usr/bin/myscript.py
Add the following content to the script. You can use your own Python script as per requirements.
1 2 3 4 5 6 7 8 9 10 11 12 | #!/usr/bin/python3 import socket s = socket.socket(socket.AF_INET, socket.SOCK_STREAM) s.bind(("localhost", 9988)) s.listen(1) while True: conn, addr = s.accept() data = conn.recv(1024) conn.close() my_function_that_handles_data(data) |
Press `CTRL + X` and then press `Y` and hit `Enter` button to save and close the file.
Step 2 – Create a Systemd Service File
Create a Systemd service file that specifies the script you want to run and any additional options or dependencies. The service file should be named after the service, and it should end with the .service extension. For example, to create a service named myscript, you can create a file named `myscript.service` in the `/etc/systemd/system` directory.
sudo nano /lib/systemd/system/myscript.service
Add the following content to it. Change the Python script filename and location.
1 2 3 4 5 6 7 8 9 10 11 12 | [Unit] Description=Custom Python Service After=multi-user.target Conflicts=getty@tty1.service [Service] Type=simple ExecStart=/usr/bin/python3 /usr/bin/myscript.py StandardInput=tty-force [Install] WantedBy=multi-user.target |
Press `CTRL + X` and then press `Y` and hit `Enter` button to save and close the file.
Step 3 – Enable and Start Service
Reload the Systemd daemon to pick up the new service file. You can use the `systemctl` command to reload the daemon and make the service available.
sudo systemctl daemon-reload
Enable the service to run at startup. You can use the `systemctl` command to enable the service, which will cause it to start automatically when the system boots.
sudo systemctl enable myscript.service
You can use the `systemctl` command to start the service manually, or you can wait for the next system startup to run the script automatically.
sudo systemctl start myscript.service
Step 4 – Check Service Status
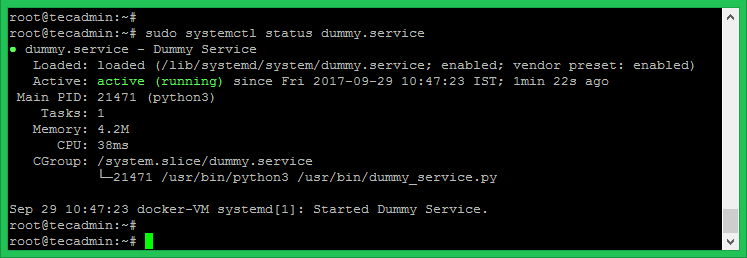
Finally, check the current service status by running the following command.
sudo systemctl status myscript.service
Conclusion
In conclusion, Systemd is a powerful tool for automating the execution of Python scripts on Linux systems. By creating a Systemd service and enabling it to run at startup or on a schedule, you can ensure that your Python scripts are run consistently and reliably.
Overall, Systemd is a useful tool for automating the execution of Python scripts, and it can help you to manage and maintain your scripts more effectively. I hope this article has provided a helpful guide to automating Python scripts with Systemd, and I encourage you to explore the many other features and capabilities of this powerful tool.


11 Comments
it helped me on centos 8.
i have added “WorkingDirectory” to solve some issues.
thanks for this post.
A fine and simple to follow tutorial. I would add a couple of caveats – with the .service file as written the python script will be run as root and this may have unintended consequences. Also the environment will be different from that for a normal user. To fix add the lines User=username and Group=groupname before the ExecStart line. To add environment variables expected by the script add the line Environment=”variable_name=variable_value” before the ExecStart line.
Thank you very much.
Could you kindly also provide where I can find more information concerning this?
for example the type of service and other parameters it uses such as confilicts, etc?
I’d greatly appreciate it
Hi,
I am trying to deploy my flask code as service.
it uses a virtual environment that has flask installed. How can I link my virtual environment with my python code?
For anyone still looking for an answer:
Add the path of the virtual environment’s python binary.
Example, if your virtual env is installed at home/user/environ, then change the following
ExecStart=/usr/bin/python3 /usr/bin/dummy_service.py
To:
ExecStart=/home/user/environ/bin/python3 /usr/bin/dummy_service.py
Thanks – perfect for my needs.
Hi, how it will work if I would add time.sleep(23) in my python script? Will run every 23 minutes ?
sleep(23) would sleep for 23 seconds. But, yes, that would work in a service script.
Hello, this is a good tutorial. Is there more information on capturing logs? I am familiar with the logging module for python but incase there were mistakes made for catching exeptions etc., how could these be written to a file?
THANKS!
thanks bro