Apache and PHP-FPM are both widely used in web development to serve dynamic content. While Apache is the most popular web server used today, PHP-FPM is a FastCGI process manager that provides a faster and more efficient way to process PHP requests. Combining the two can significantly improve the performance of a website.
In this article, we will provide a step-by-step guide on how to install Apache with PHP-FPM on Ubuntu 22.04.
Step 1: Update your system
Before installing any new software, you should update your system to ensure that all packages are up to date. You can do this by running the following command in the terminal:
sudo apt update && sudo apt upgrade
Step 2: Install Apache
To install Apache on Ubuntu 22.04, run the following command in the terminal:
sudo apt install apache2
Once the installation is complete, you can start the Apache service by running the following command:
sudo systemctl start apache2
You can also enable Apache to start at boot time by running the following command:
sudo systemctl enable apache2
Step 3: Install PHP-FPM
The default repositories may not contain the latest PHP version packages. So we always prefer to use ondrej/php PPA for installing PHP that contains most of the versions.
- To configure PPA, run the following commands:
sudo apt install python-software-propertiessudo add-apt-repository ppa:ondrej/php - Then install the PHP along with PHP-FPM, by running the following command in the terminal:
sudo apt install php8.2 php8.2-fpmNote: Replace “8.2” with the required PHP versions (Like: 8.1, 7.4, 7.3, etc).
- Once the installation is complete, you can start the PHP-FPM service by running the following command:
sudo systemctl start php8.2-fpm - You can also enable PHP-FPM to start at boot time by running the following command:
sudo systemctl enable php8.2-fpm
Step 4: Configure Apache to use PHP-FPM
- To configure Apache to use PHP-FPM, you need to enable the “proxy_fcgi” and “proxy” modules. You can do this by running the following command:
sudo a2enmod proxy_fcgi proxy - Create a new configuration file for your virtual host using the following command:
sudo nano /etc/apache2/sites-available/example.com.confNote: Replace “example.com” with your domain name.
- Inside the new configuration file, add the following configuration with PHP-FPM:
<VirtualHost *:80>
    ServerName example.com
    ServerAlias www.example.com
    DocumentRoot /var/www/html

    <Directory /var/www/html>
        Options -Indexes +FollowSymLinks +MultiViews
        AllowOverride All
        Require all granted
    </Directory>

    <FilesMatch \.php$>
        SetHandler "proxy:unix:/run/php/php8.2-fpm.sock|fcgi://localhost/"
    </FilesMatch>

    ErrorLog ${APACHE_LOG_DIR}/error.log
    CustomLog ${APACHE_LOG_DIR}/access.log combined
</VirtualHost>
Note: Adjust the “ServerName”, “ServerAlias”, “DocumentRoot” directives, and PHP FPM socket path to match your domain and desired file path.
- Save and close the file by pressing CTRL+X, then Y and ENTER.
- Enable the new virtual host by running the following command:
sudo a2ensite example.com.conf - Reload the Apache web server to apply the changes:
sudo systemctl reload apache2
Step 5: Test the configuration
To test the Apache with PHP-FPM configuration, create a new PHP file in the document root directory of your website:
sudo nano /var/www/html/info.php
Add the following lines to the file:
<?php
  phpinfo();
?&t;
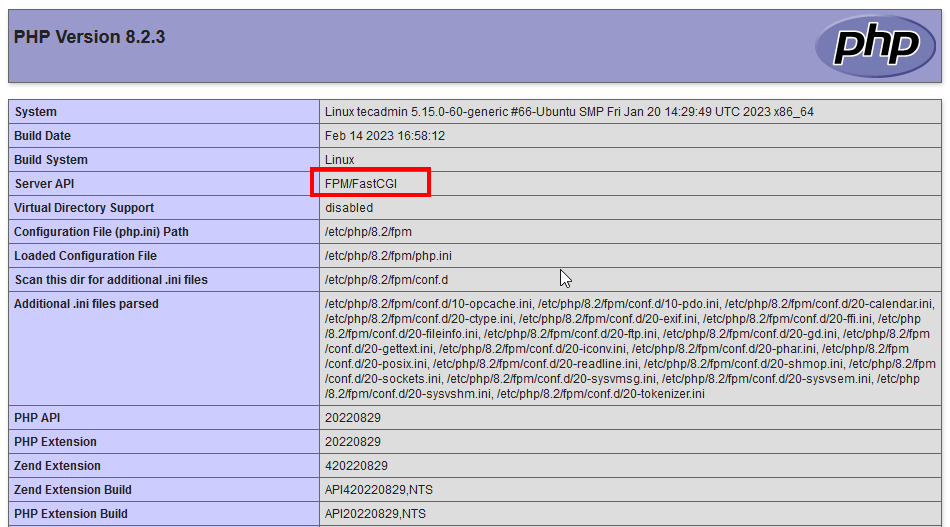
Save the file and exit the text editor. Then, open your web browser and navigate to “http://server-ip-or-domain/info.php”. If everything is configured correctly, you should see the PHP information page.
Conclusion
Installing Apache with PHP-FPM on Ubuntu 22.04 can enhance website performance and overall user experience. Apache is a widely used web server, while PHP-FPM is a FastCGI process manager that enables efficient processing of PHP requests. Together, they provide a powerful combination that can optimize website speed and performance. By following the step-by-step guide in this article, you can easily install Apache with PHP-FPM on Ubuntu 22.04 and take advantage of its benefits.

