LAMP (Short form of Linux, Apache, MySQL, and PHP ) Stack is the most popular environment in PHP website development and web hosting. Where Linux is an operating system, Apache is the popular web server developed by Apache Foundation, MySQL is relational database management system used for storing data and PHP is the widely used programming language.
This article will help you to Install Apache 2.4, MySQL 5.7 and PHP 7.2 on Ubuntu 16.04 LTS Systems.
Step 1 – Install PHP
PHP 7 is the default available packages in Ubuntu 16.04 repositories. Simply use the following commands to update apt cache and install PHP packages on your system.
sudo apt-get install python-software-properties
sudo add-apt-repository ppa:ondrej/php
sudo apt update
sudo apt install -y php7.2
You may also need to install some additional PHP modules for supporting various tasks
sudo apt install php7.2-curl php7.2-gd php7.2-json php7.2-mbstring php7.2-mcrypt
Step 2 – Install Apache2
After installing PHP on your system, let’s start the installation of Apache2 in your system. Your also required to install libapache2-mod-php module to work PHP with Apache2.
sudo apt install apache2 libapache2-mod-php7.2
Step 3 – Install MySQL
Finally, install mysql-server packages for MySQL database. Also, install php-mysql package to use MySQL support using php. Use the following command to install it.
sudo apt install mysql-server php7.2-mysql
The installer will prompt for root password, This password will work for your MySQL root user. After installing MySQL execute the following command for initial settings of MySQL server. You will see that script will prompt for more settings than earlier MySQL versions like password validation policy etc.
sudo mysql_secure_installation
You can also install phpMyAdmin for the administration of MySQL using web interface.
sudo apt install phpmyadmin
Step 4 – Restart Services
After installing all the services on your system. Restart MySQL and Apache service to reload any changes done manually.
sudo systemctl restart apache2.service
sudo systemctl restart mysql.service
Step 5 – Open Access in Firewall
The systems with iptables/ufw enabled, execute the following commands to open port 80 for public access of web server.
Iptables Users:
sudo iptables -A INPUT -m state --state NEW -p tcp --dport 80 -j ACCEPT
UFW Users:
sudo ufw allow 80/tcp
Step 6 – Test Setup
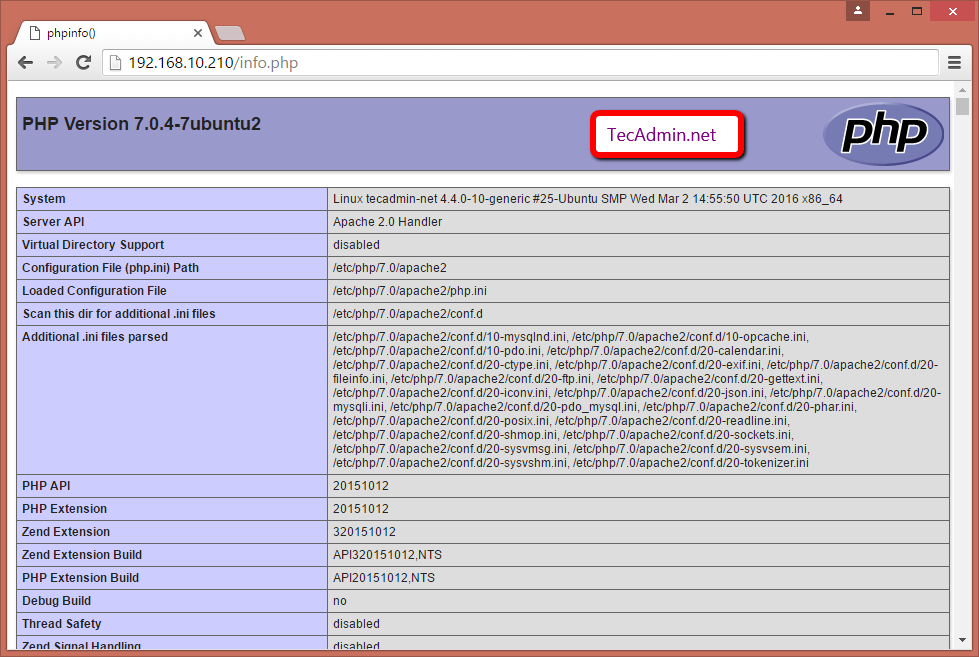
After completing all setup. Let’s create a info.php file website document root with following content.
<?php
 phpinfo();
?>
Now access this file in web browser. You will see the screen like below with all details of PHP on server.
12 Comments
Congratulation’s.
Illegal scope issue – congratulation ownership error – does this belong to congratulation, so is congratulation’s? No it is a greeting. Congratulations.
Syntax error, no apostrophe needed
Before you enter the command “sudo apt-get install python-software-properties”, you have to update your machine (Ubuntu 16.04 LTS x64) with “sudo apt-get update”.
What about phpMyAdmin?? Does it come with the MySQL installation?
Perfect! after following instructions i now have a website, which is running well!
No issues after installing and rebooting the server.
Thank you very much!!
Apache2 , MySQL are working but PHP is not working, displaying the real code instead of the result.
Any idea? All worked fine with Ubuntu 15.04. I really need to fix this cause my work is dependingn on this
Hi Daryl
Make sure you have installed libapache2-mod-php Apache module
$ apt install libapache2-mod-php
Still doesn’t work. I tried “sudo apt install libapache2-mod-php”. It says I’m on the newest version.
don’t forget to install php-gettext
Do these :
$ sudo apt-get purge php*
$ sudo apt-get install php
$ apt-get install libapache2-mod-php7.0
it should be work now if it’s not try
$ apt-get install php-gettext
try this again. Let me know if it’s help or not
Thank you. It’s worked well
Thank you so much…