Apache Tomcat 9 is the latest version available for installation. Apache Tomcat is a product of the Apache Software Foundation. It is an open-source implementation of the Java Servlet and JavaServer Pages (JSP) technologies. Tomcat is a web server used for hosting the Java-based web application.
The current Apache Tomcat 9.0.50 release is available. This tutorial will guide you through step by step installation of the Apache Tomcat server on Debian. Let’s follow to Install Apache Tomcat 9 on Debian 10/9/8.
Step 1 – Prerequisites
You must have root user or sudo privileged user access to install Tomcat on the Debian system. Login to your Debian system with shell access. Use SSH to get access to the remote Linux system.
ssh root@debian
Now update the apt package manager cache and upgrade the current packages of the system.
sudo apt update
sudo apt upgrade
Step 2 – Install Java
You must have Java installed on the system before installing Apache Tomcat on a Linux VPS. Tomcat 9 required Java 8 or later versions to work.
java -version

java version "1.8.0_161"
Java(TM) SE Runtime Environment (build 1.8.0_161-b12)
Java HotSpot(TM) 64-Bit Server VM (build 25.161-b12, mixed mode)
If you don’t have Java installed on your system or installed a lower version, Use this tutorial to install Java 8 on a Debian machine.
Step 3 – Install Apache Tomcat 9 on Debian
You need to download the Tomcat archive from its official download website or mirrors. Download Apache Tomcat 9 archive file using following commands or you can visit Tomcat 9 official download page for download most recent available version.
wget https://dlcdn.apache.org/tomcat/tomcat-9/v9.0.58/bin/apache-tomcat-9.0.58.tar.gz tar xzf pache-tomcat-9.0.58.tar.gzmv apache-tomcat-9.0.58 /usr/local/tomcat9
Step 4 – Configure Tomcat on Debian
Configure the required environment variables for the Tomcat. Set CATALINA_HOME to the extracted tomcat directory. Also, set Java environment variables as per Java installed on your system. Set all these variables in a file /etc/profile.d/tomcat9.sh.
echo 'export CATALINA_HOME="/usr/local/tomcat9"' > /etc/profile.d/tomcat9.sh
echo 'export JAVA_HOME="/usr/lib/jvm/java-8-oracle"' >> /etc/profile.d/tomcat9.sh
echo 'export JRE_HOME="/usr/lib/jvm/java-8-oracle/jre"' >> /etc/profile.d/tomcat9.sh
This file will automatically load variables after system reboot. To load in current environment run command:
source /etc/profile.d/tomcat9.sh
Step 5 – Setup Tomcat User Accounts
Y need to create user accounts to secure and access admin/manager pages. Edit conf/tomcat-users.xml file in your editor and paste inside <tomcat-users> </tomcat-users> tags.
<!-- user manager can access only manager section --> <role rolename="manager-gui " /> <user username="manager " password="_SECRET_PASSWORD_ " roles="manager-gui " /><!-- user admin can access manager and admin section both --> <role rolename="admin-gui " /> <user username="admin " password="_SECRET_PASSWORD_ " roles="manager-gui,admin-gui " />
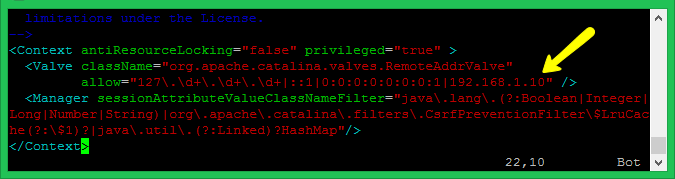
Step 6 – Enable Host/Manager for Remote IP
The default manager and host-manager web pages are enabled to access from localhost only. To access these pages from the remote system, you have to allow your IP or IP range in the application-specific context.xml file.
Manager File: ./webapps/manager/META-INF/context.xml
Host Manager File: ./webapps/host-manager/META-INF/context.xml
Edit the above files and add your IP address like the screenshot. After making changes restart the Tomcat service.
Step 7 – Start Tomcat Service
Tomcat is very easy to use, There is no need to compile its source. You simply extract the archive and start the tomcat server. Tomcat by default start on port 8080, So make sure no other application using the same port.
chmod +x ./bin/startup.sh
./bin/startup.sh
[Sample Output]
Using CATALINA_BASE:   /usr/local/tomcat9
Using CATALINA_HOME:   /usr/local/tomcat9
Using CATALINA_TMPDIR: /usr/local/tomcat9/temp
Using JRE_HOME:        /usr/lib/jvm/java-8-oracle/jre
Using CLASSPATH:       /usr/local/tomcat9/bin/bootstrap.jar:/usr/local/tomcat9/bin/tomcat-juli.jar
Tomcat started.
Use below command to stop tomcat server on your system.
./bin/shutdown.sh
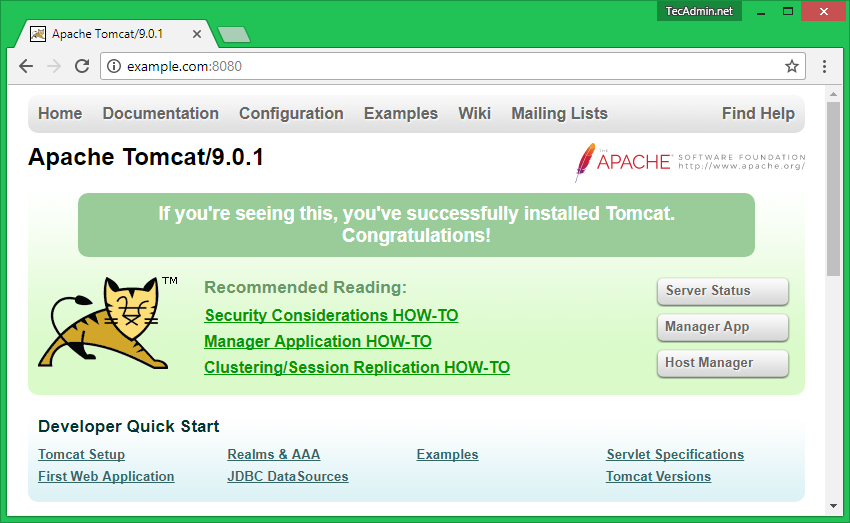
Step 8 – Access Tomcat in Browser
Tomcat service uses default port 8080. Open your favorite web browser and connect to your server on port 8080. This will provide access to the Tomcat setup on your system.
http://localhost.com:8080
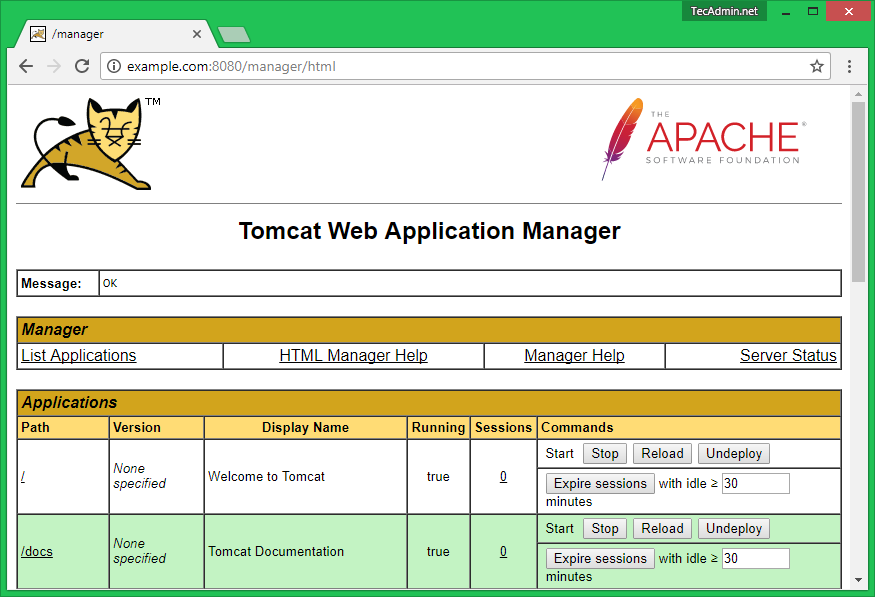
http://example.com:8080/manager/html
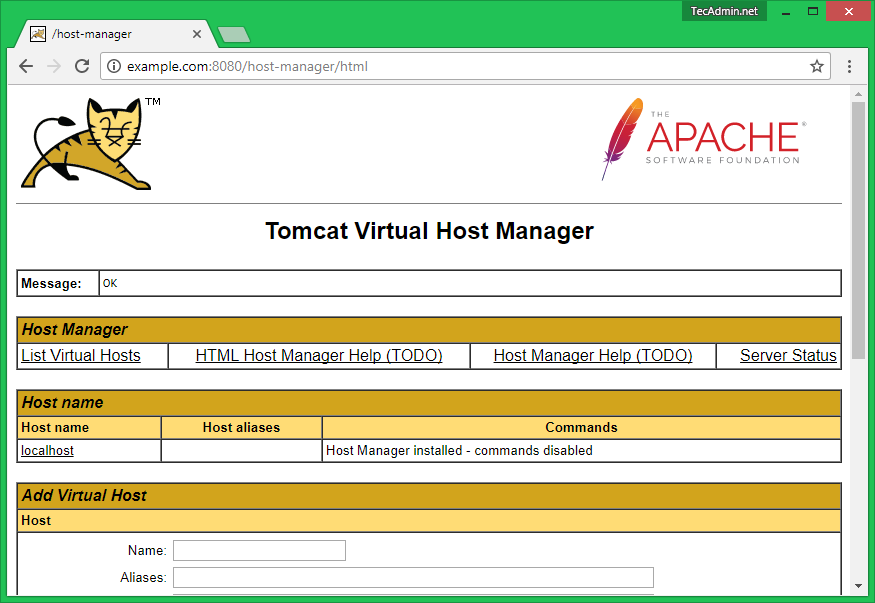
http://example.com:8080/host-manager/html

5 Comments
Thanks it’s help me a lot.
this code is wrong:
echo ‘export CATALINA_HOME=”/usr/local/tomcat9″‘ > /etc/profile.d/tomcat9.sh
change to:
echo ‘export CATALINA_HOME=”/usr/local/tomcat9″‘ > /etc/profile.d/tomcat9.sh
apache-tomcat9
this code is wrong:
echo ‘export CATALINA_HOME=”/usr/local/tomcat9″‘ > /etc/profile.d/tomcat9.sh
change to:
echo ‘export CATALINA_HOME=”/usr/local/apache-tomcat9″‘ > /etc/profile.d/tomcat9.sh
Thanks Bruno.
Hello,
I think the service is not prépared to restart on reboot…
KR