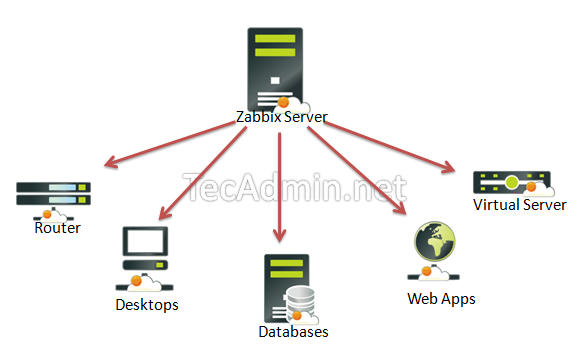
This article will help you to step by step install Zabbix on Ubuntu 18.04 & 16.04 LTS systems. If you are using CentOS, RHEL or Fedora then Click here to install Zabbix on CentOS, RHEL or Fedora
Step 1 – Install Apache, MySQL and PHP
You must have a LAMP environment on your server to use Zabbix. If you already have LAMP configured, just skip this step, else install Apache, MySQL, and PHP using the following commands.
sudo apt-get update
sudo apt-get install apache2 libapache2-mod-php
sudo apt-get install mysql-server
sudo apt-get install php php-mbstring php-gd php-xml php-bcmath php-ldap php-mysql
Update timezone in php configuration file /etc/php/
[Date]
; http://php.net/date.timezone
date.timezone = 'Asia/Kolkata'
Step 2 – Enable Required Apt Repository
Before installing Zabbix first configure Zabbix package repository in your system using following commands. Use commands as per your operating system.
## Ubuntu 18.04 LTS (Bionic):wget https://repo.zabbix.com/zabbix/4.0/ubuntu/pool/main/z/zabbix-release/zabbix-release_4.0-3+bionic_all.deb sudo dpkg -i zabbix-release_4.0-3+bionic_all.deb ## Ubuntu 16.04 LTS (Xenial): wget https://repo.zabbix.com/zabbix/4.0/ubuntu/pool/main/z/zabbix-release/zabbix-release_4.0-3+xenial_all.deb sudo dpkg -i zabbix-release_4.0-3+xenial_all.deb
Step 3 – Install Zabbix Server
After adding Zabbix apt repository in your system use following command to install Zabbix server. Here zabbix-server-mysql package includes Zabbix server with MySQL support. The zabbix-frontend-php package provides and web interface is written in PHP for the Zabbix server management
sudo apt-get update
sudo apt-get install zabbix-server-mysql zabbix-frontend-php zabbix-agent
Step 4 – Create Database Schema
Now create a database schema for your Zabbix server. Login to your MySQL server using administrative privileges and use the following queries to create MySQL database and user for the Zabbix server.
mysql -u root -p

mysql> CREATE DATABASE zabbixdb character set utf8 collate utf8_bin;
mysql> CREATE USER 'zabbix'@'localhost' IDENTIFIED BY 'password';
mysql> GRANT ALL PRIVILEGES ON zabbixdb.* TO 'zabbix'@'localhost' WITH GRANT OPTION;
mysql> FLUSH PRIVILEGES;
Also, load the Zabbix database schema to the database created above.
cd /usr/share/doc/zabbix-server-mysql
zcat create.sql.gz | mysql -u zabbix -p zabbixdb
Step 5 – Edit Zabbix Configuration File
Edit Zabbix server configuration file /etc/zabbix/zabbix_server.conf in your favorite text editor and update the following database configurations. This will be used by Zabbix server to connect to the database.
  DBHost=localhost
  DBName=zabbixdb
  DBUser=zabbix
  DBPassword=password
Step 6 – Restart Apache and Zabbix
Zabbix creates its own apache configuration file
sudo service apache2 restart
Zabbix server configuration file are located at
sudo service zabbix-server restart
After starting the Zabbix service, let’s go to Zabbix web installer and finish the installation.
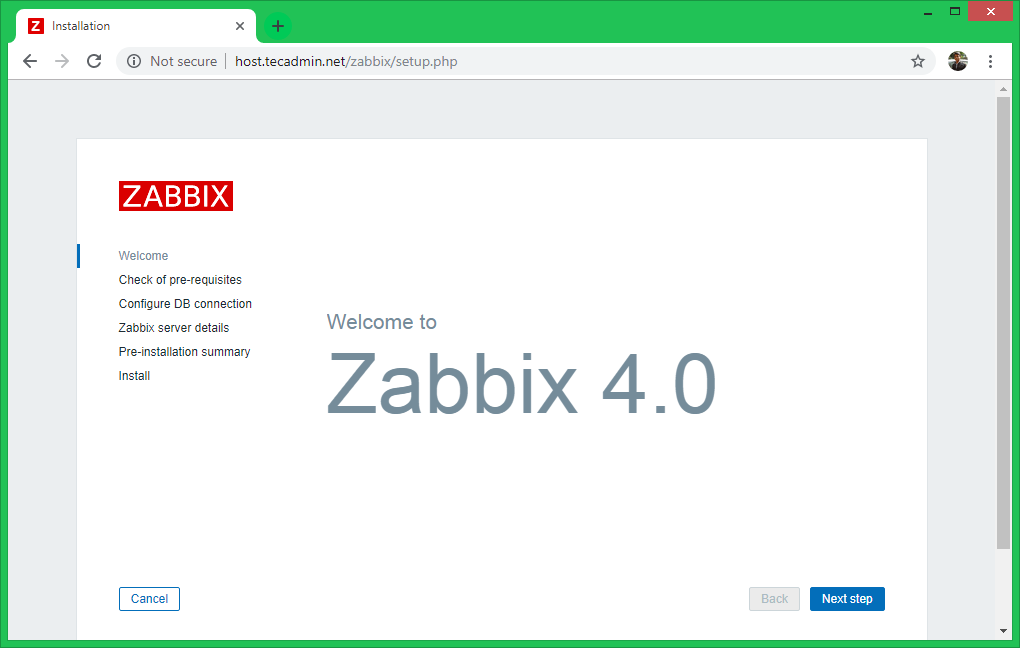
Step 7 – Complete Zabbix Web Installer Wizzard
Zabbix web installer can be accessed on /zabbix subdirectory URL on your servers IP or domain. For example, host.tecadmin.net is pointed to my Zabbix server. Now access the Zabbix using the following URL. You must change FQDN as per your setup.
http://host.tecadmin.net /zabbix/
and follow the steps as per given screenshots below.
Zabbix Setup Welcome Screen
This is the welcome screen of Zabbix web installer. Go forward by click on next button.
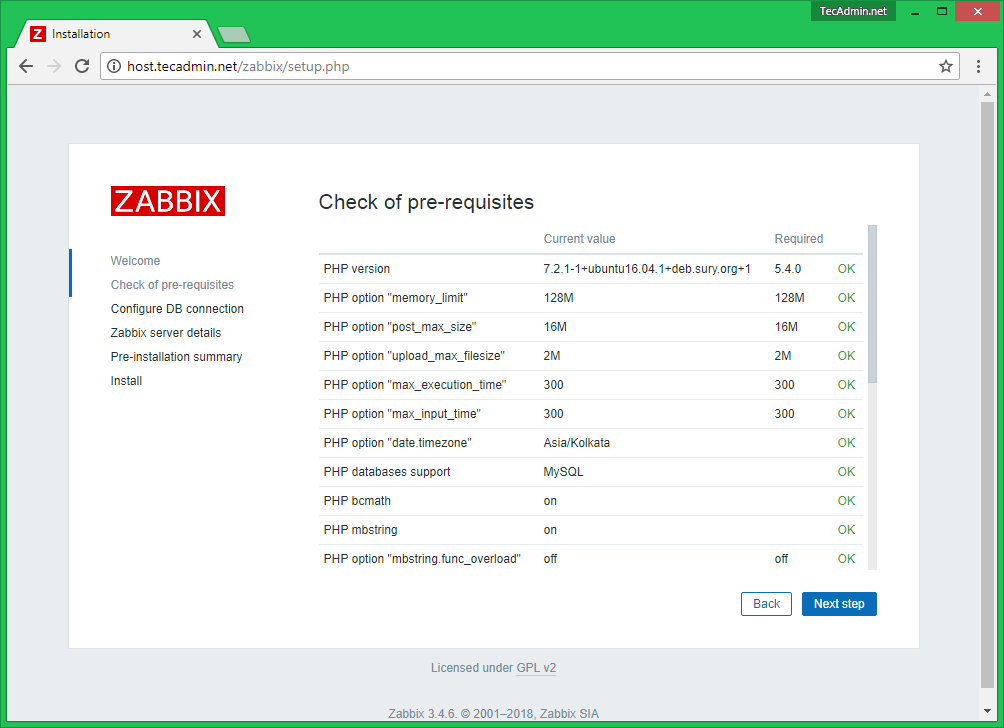
Check for pre-requisities
Check if your system has all required packages, if everything is ok click next.
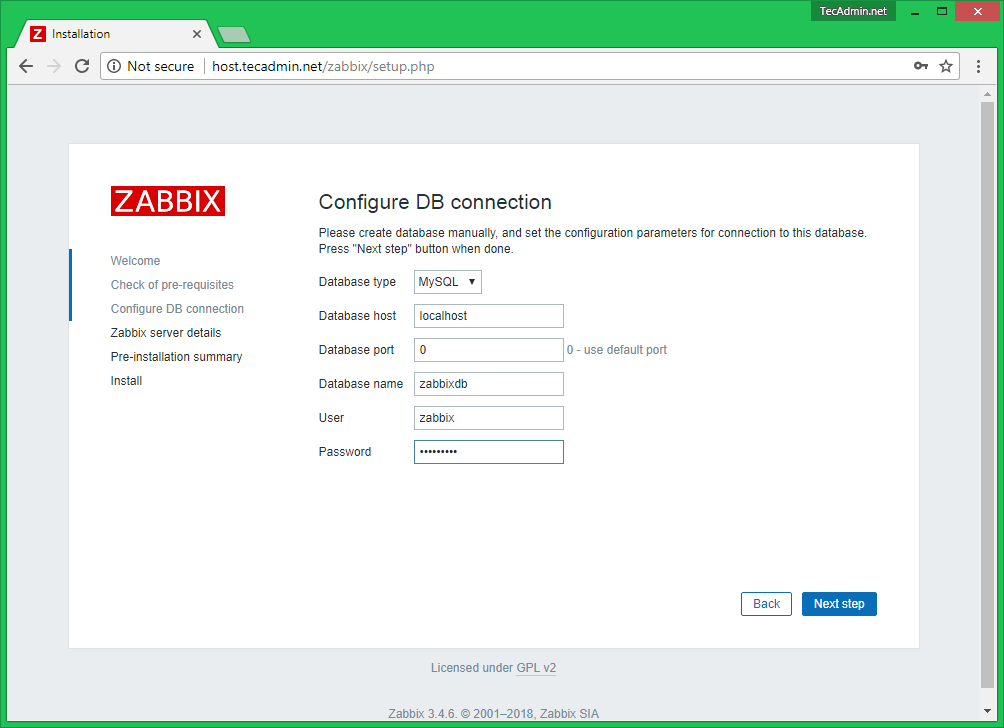
Configure DB Connection
Enter database details created in Step #4 and click next to continue.
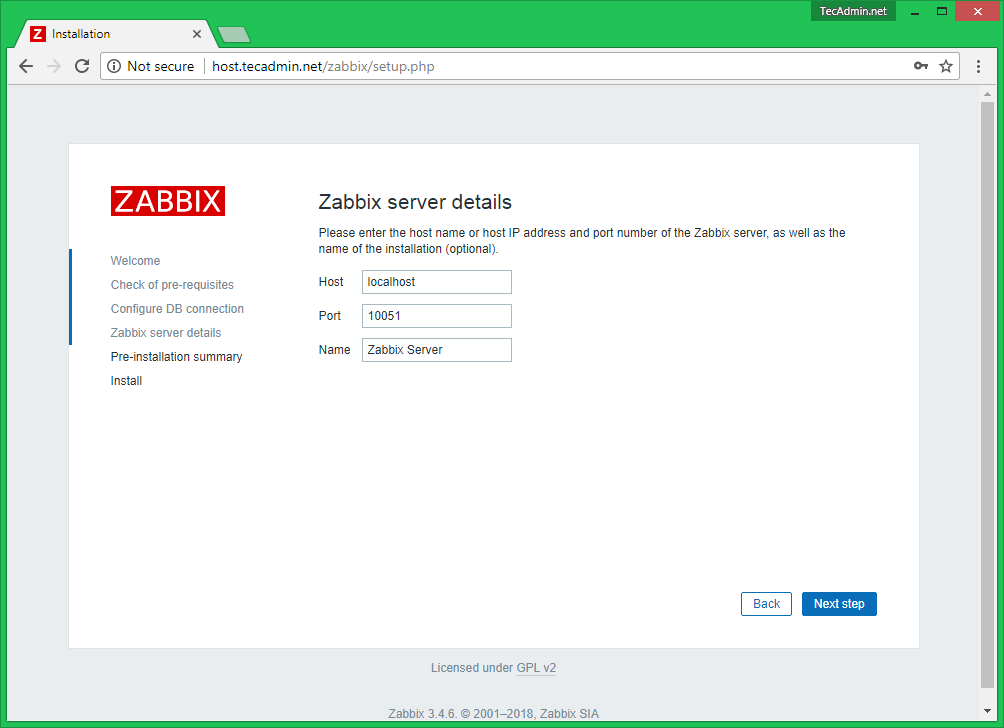
Zabbix Server Details
This is the host and port of running Zabbix server. As your Zabbix server is running on the same host, so keep the values unchanged. You can give a name for your instance.
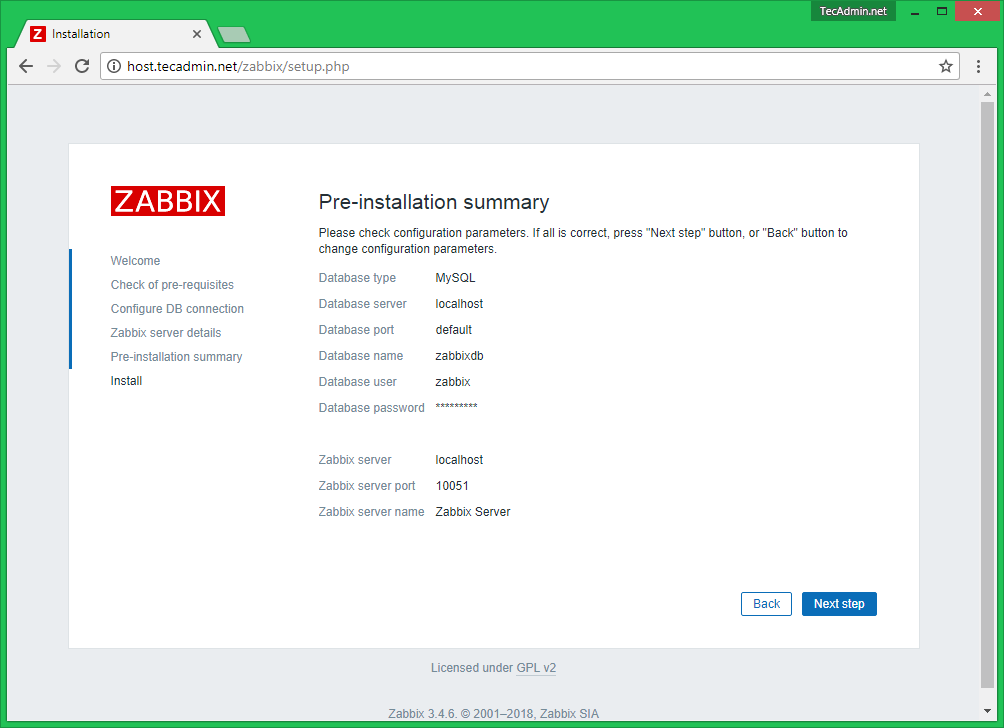
Pre-Installation Summary
In this step will show the summary you have entered previous steps, so simply click next.
Install Zabbix
If everything goes correctly, You will see a successful installation message on this page. This will also show you a message for the created configuration file.

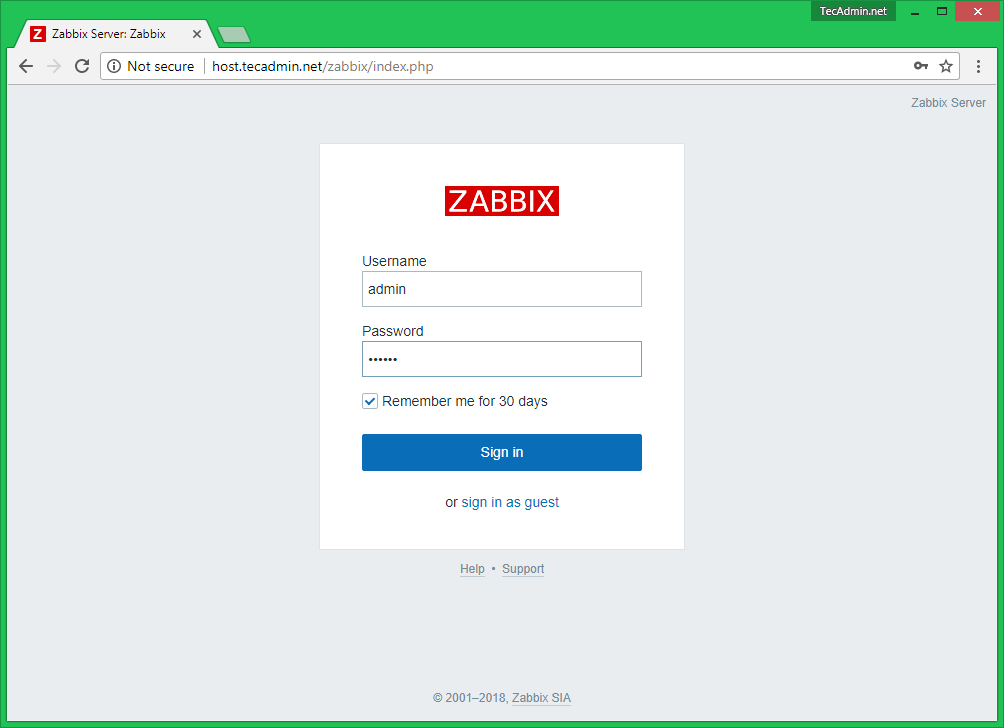
Zabbix Login Screen
Login to Zabbix using default credentials.
 Username:  Admin
 Password:  zabbix
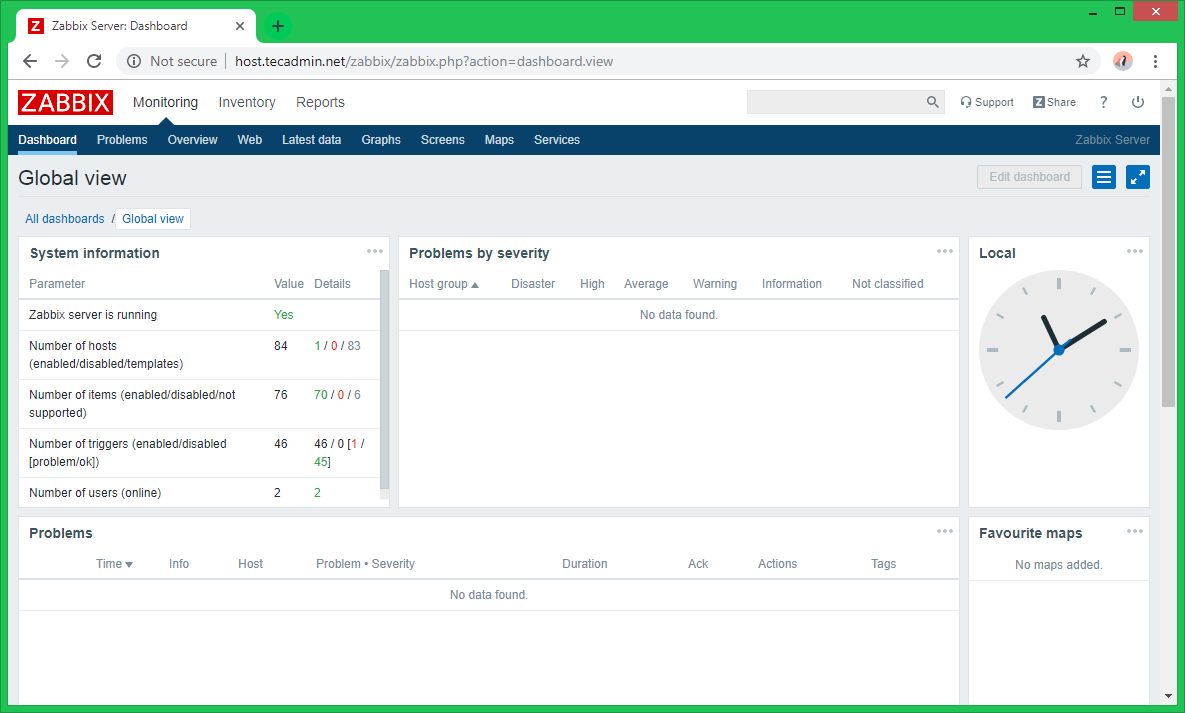
After successful login, You will get Zabbix dashboard like below.
41 Comments
thanks
i am facing the issue
zabbix server is not running the information displayed may not be current
Please help me.
thank you very much friend
thanks
hellow , i have a trouble when i whant to open zabbix. can you help me to tell me how i get ip or domain on step 7?
thank you abaout yout attention sir.
Hello,
Please, can you help wit this error message. I tried to install zabbix 3.4 Everything went successful till when I login to the broswer.
I got the error below:
——————————————————————————–
Cannot connect to the database.
Details
The frontend does not match Zabbix database.
———————————————————————
I created the database manually but the error is still the same as above.
Thank you.
Amigo, como configuro para cambiar la URL desde la IP a un dominio dentro de zabbix? Actualmente tengo problemas el localhost o la ip me levanta mediante LYNX pero dentro en mi ordenador apunto al servidor donde se encuentra zabbix con su IP sin habilitarlo con pto solo xxx.xxxx.xxxx.xxx/zabbix y tarda en conectar hasta que no me levanta el frontend, servicios activos zabbixS, zabbixA,httpd,php. Pero quiero probar intentando cambiar la ip por el dominio. si mi host es el admlog01 como lo adiciono en el archivo etc/hostname
I just ran through this, had problems with my install. On Ubuntu 18.04 fresh install you need to install nmap (apt install nmap)
Hello sir. Thanks for sharing this post. I did step by step until item 7. When I try to run setup from http://zabbix.caruso.com.ar/zabbix, even I tried http://zabbix.caruso.com.ar/zabbix/setup.php, it doesnt’ show the page, I just see the following. Any help?
run(ZBase::EXEC_MODE_SETUP);
}
catch (Exception $e) {
(new CView(‘general.warning’, [
‘header’ => $e->getMessage(),
‘messages’ => [],
‘theme’ => ZBX_DEFAULT_THEME
]))->render();
exit;
}
// VAR TYPE OPTIONAL FLAGS VALIDATION EXCEPTION
$fields = [
‘type’ => [T_ZBX_STR, O_OPT, null, IN(‘”‘.ZBX_DB_MYSQL.'”,”‘.ZBX_DB_POSTGRESQL.'”,”‘.ZBX_DB_ORACLE.'”,”‘.ZBX_DB_DB2.'”‘), null],
‘server’ => [T_ZBX_STR, O_OPT, null, null, null],
‘port’ => [T_ZBX_INT, O_OPT, null, BETWEEN(0, 65535), null, _(‘Database port’)],
‘database’ => [T_ZBX_STR, O_OPT, null, NOT_EMPTY, null, _(‘Database name’)],
‘user’ => [T_ZBX_STR, O_OPT, null, null, null],
‘password’ => [T_ZBX_STR, O_OPT, null, null, null],
‘schema’ => [T_ZBX_STR, O_OPT, null, null, null],
‘zbx_server’ => [T_ZBX_STR, O_OPT, null, null, null],
‘zbx_server_name’ => [T_ZBX_STR, O_OPT, null, null, null],
‘zbx_server_port’ => [T_ZBX_INT, O_OPT, null, BETWEEN(0, 65535), null, _(‘Port’)],
// actions
‘save_config’ => [T_ZBX_STR, O_OPT, P_SYS, null, null],
‘retry’ => [T_ZBX_STR, O_OPT, P_SYS, null, null],
‘cancel’ => [T_ZBX_STR, O_OPT, P_SYS, null, null],
‘finish’ => [T_ZBX_STR, O_OPT, P_SYS, null, null],
‘next’ => [T_ZBX_STR, O_OPT, P_SYS, null, null],
‘back’ => [T_ZBX_STR, O_OPT, P_SYS, null, null],
];
CSession::start();
CSession::setValue(‘check_fields_result’, check_fields($fields, false));
if (!CSession::keyExists(‘step’)) {
CSession::setValue(‘step’, 0);
}
// if a guest or a non-super admin user is logged in
if (CWebUser::$data && CWebUser::getType() addCssFile(‘styles/’.CHtml::encode($theme).’.css’)
->addJsFile(‘js/browsers.js’)
->addJsFile(‘jsLoader.php?ver=’.ZABBIX_VERSION.’&lang=’.CWebUser::$data[‘lang’])
->display();
/*
* Displaying
*/
$link = (new CLink(‘GPL v2’, ‘http://www.zabbix.com/license.php’))
->setTarget(‘_blank’)
->addClass(ZBX_STYLE_GREY)
->addClass(ZBX_STYLE_LINK_ALT);
$sub_footer = (new CDiv([‘Licensed under ‘, $link]))->addClass(ZBX_STYLE_SIGNIN_LINKS);
(new CTag(‘body’, true, [(new CTag(‘main’, true, [$ZBX_SETUP_WIZARD, $sub_footer])), makePageFooter()]))
->setAttribute(‘lang’, CWebUser::getLang())
->show();
?>
It looks you need to install libapache2-mod-php package on your system.
Hello my friend, i have an error, showed sql codes on page, I solved installing libapache2-mod-php
Please change
Username: admin
to
Username: Admin
The username is case sensitive, [a]dmin doesnt work
Hi thanks for you work even if I got some issues to manage !
Indeed the only supported version of PHP is PHP5.6 ; Php7 is not. That’s too bad because that was the only reason i got stroke for so many hours !
Finally i can run zabbix 🙂
For all those who deal with zabbix nowadays, i advise you to follow this tutorial to install php5.6 (on the same website) : https://tecadmin.net/install-zabbix-agent-on-ubuntu-and-debian/
P.S. I’m on Ubuntu 16
A simple scripted install version! Great Guide BTW!
cat <install_zabbix_ubuntu14.sh
#!/bin/bash
#MySQL Password
password=zabbix
#PHP TimeZone
timezone=”America/New_York”
#Latest Package URL
latest=”http://repo.zabbix.com/zabbix/3.2/ubuntu/pool/main/z/zabbix-release/zabbix-release_3.2-1+trusty_all.deb”
#Install Zabbix Agent + Server + Pre-Reqs
wget $latest
dpkg -i zabbix-release*.deb
apt-get update
apt-get install -y zabbix-server-mysql php5-mysql zabbix-frontend-php zabbix-agent
#Create Database + Zabbix User + Import DB Configs
mysql -p -e “create database zabbix character set utf8”
mysql -p -e “grant all on zabbix.* to ‘zabbix’@’localhost’ identified by ‘$password'”
zcat /usr/share/doc/zabbix-server-mysql/*.sql.gz | mysql -uzabbix -p”$password” zabbix
#Configure Zabbix to use SQL Backend
sh -c ‘echo “DBHost=localhost\nDBName=zabbix\nDBUser=zabbix\nDBPassword=” >> /etc/zabbix/zabbix_server.conf’
sed -i ‘s,^\(DBPassword[ ]*=\).*,\1’$password’,g’ /etc/zabbix/zabbix_server.conf
#Enable Pre-Defined Apche Configs
echo “Uncomment # php_value date.timezone Europe/Riga”
echo “Set TimeZone to $timezone”
sleep 5
nano /etc/apache2/conf-available/zabbix.conf
service apache2 restart
#Start services and enable on boot
#Reboot to test services at startup
service zabbix-server start
service zabbix-agent start
update-rc.d zabbix-server defaults
update-rc.d zabbix-agent defaults
reboot
EOL
chmod +x install_zabbix_ubuntu14.sh
./install_zabbix_ubuntu14.sh
I’m just getting into Zabbix! If you want to follow along, check out https://www.freesoftwareservers.com/wiki/zabbix-12517480.html
May be somebody will find it useful:
While installing frontend,at Check of pre-requisites stage were not found following instances:
PHP bcmath extension missing (PHP configuration parameter –enable-bcmath).
PHP mbstring extension missing (PHP configuration parameter –enable-mbstring).
PHP xmlwriter extension missing.
PHP xmlreader extension missing.
It can be fixed (at least it worked for me) by installing them seperatly
sudo apt-get install php-bcmath
sudo apt-get install php-mbstring
sudo apt-get install php-xml
The right folder is /usr/share/zabbix-server-mysql/ not /usr/share/doc/zabbix-server-mysql/
PHP5 is no longer available on the latest versions of Ubuntu and Debian so this guide doesn’t work for those.
Hello, I would like to thank you for this post. After waisting time with several other tutorials and guides, I was amost giving up. Then, I got this guide and make it work in just 20 minutes. Like a miracle! Thanks !!!
bonsoir
jair suivie les differente etapes jusqu’a la 6eme lorsque je tape cette commande:sudo service zabbix-server restart,et j’ai la reponse suivante:zabbix-server stop/pre-start, process 22541
et apres insistance j’ai ce message :
stop: Unknown instance:
zabbix-server stop/waiting
comment je fais s’il vous plait
bonsoir svp aider moi. j’ai ce message d’erreur lorsque je suis a l’Étape d’installation suivante: Configure DB connection
Details Cannot connect to the database.
Error connecting to database: Access denied for user ‘admin’@’localhost’ (using password: YES)
bojour
s’il vous plait je fais pour supprimer toute les configuration precedente si j’ai fait un erreur?
je suis bloqué a la fin de la première étape
moi j’utilise ubuntu 15.01
merci!!
Excellent post!
Great!! best guid!
Thanks!!!!
Hi,
during the Installation on “Configure DB Connection” i got this error:
Cannot connect to the database.
Error connecting to database: Access denied for user ‘zabbix’@’localhost’ to database ‘zabbixdb’
What’s the problem? Datebasename and password will set correctly.
this guide is not complete. after doing the step 4, need to run the Database creation scripts
https://www.zabbix.com/documentation/3.0/manual/appendix/install/db_scripts
after it will resolved the issue.
Why after installation complete on the zabbix web is show “Zabbix server is not running : the information displayed may not be current”. ? How can i fix it?
Is there any fix for this, please
Same here. Help please?
I test for two days a lot of tutorials and nothing I even use CENT0S instead of ubuntu.
With your tutorial everything goes smoothly and it works. Finally 🙂
Thanks
Why after installation complete on the zabbix web is show “Zabbix server is not running : the information displayed may not be current”. ? How can i fix it?
Thanks,
Toon
thx a lot dude
Hi Rahul,
Thanks. I already have. Everything went without an error but it just doesn’t work. There is something missing as between Ubuntu 12.04 and 14.04 certain places for the files have changed. I am not that proficient in Linux. So, I will wait for your update. Thanks again.
Hi,
Is there any chance you update this article for Ubuntu 14.04. I tried this method and it comes close but at the end doesn’t work. Gives an error: The requested URL /zabbix was not found on this server.
Thanks.
Hi Somayaji,
Check your Zabbix-Apache configuration file /etc/zabbix/apache.conf.
We will update this article soon.
try http://localhost/zabbix that should works.
Nevermind, I figured it out. The commands you actually want are:
wget http://repo.zabbix.com/zabbix/2.0/ubuntu/pool/main/z/zabbix/zabbix-agent_2.0.9-1+precise_amd64.deb (Assuming you are on 64bit)
sudo dpkg -i zabbix-server-mysql_2.0.9-1+precise_amd64.deb
Thanks for getting me in the right direction!
Hi Ebonweaver,
Thanks for pointing… We advise to use apt-get package manager to resolve… We have updated this article to install latest version of zabbix. I hope now it will help you
Thanks…
Dear Sir,
my setup is complete but step 4 doesnt work.
error:The frontend does not match Zabbix database.
what can i do??
database name:zabbixdb
user:zabbix
password:zabbixdb
email id:jatin.nijash@gmail.com
While this was just written today, it installs an old version of Zabbix. Current version is 2.0.9. Last repo install without these extra steps is 2.0.4. These instructions seem to install 2.0, which would be less than optimal at this point. Any ideas how to actually get 2.0.9 to install on Ubuntu?
ERROR 1050 (42S01) at line 1: Table ‘maintenances’ already exists helpme
You probably canceled the process after telling mysql to import the schema. It takes a couple minutes to complete. Now the installer can’t complete. Drop the database and start again, be patient.
I know this because I did the same thing 🙂