Hamachi is used or set up VPN and connect systems over a VPN network. This provides a quick and easier way to create a VPN network and attach a system. You can create a free account on logmein.com and create networks. You can add up to 5 systems in each network with a free account. To add more than 5 systems is required to upgrade the network to the paid version.
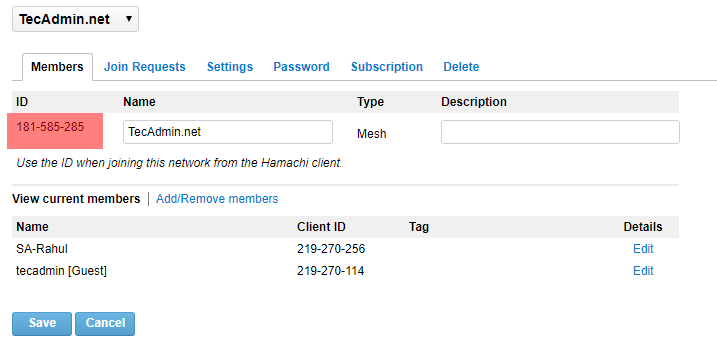
For this tutorial, I have already created a hamachi network from its web interface and get a network id and connected a windows system with this network. This tutorial will help you set up the LogMeIn VPN network and add Linux machines to this network. Also, attach a Windows system to communicate with each host over VPN.
-
Network ID:
Windows Client IP:
Linux Client IP:
Step 1: Install Required Packages
For installing hamachi on CentOS, and RedHat systems, you must have installed the redhat-lsb package. If you don’t already install it use the following command.
sudo yum install redhat-lsb
Step 2: Download LogMeIn and Install
Visit LogMeIn official download webpage to download the latest LogMeIn-hamachi packages for your Ubuntu, Debian, Redhat, Fedora, Rocky Linux, Alma Linux or Windows systems. You may also use the below commands to install the LogMeIn hamachi client on your system.
On RHEL-based Systems
The RPM packages can be installed on RHEL/CentOS 7.2 and newer versions.
wget https://vpn.net/installers/logmein-hamachi-2.1.0.203-1.x86_64.rpmsudo rpm -ivh logmein-hamachi-2.1.0.203-1.x86_64.rpm
On Debian-based Systems
The DEB packages can be installed on Ubuntu 16.04 LTS and newer versions.
wget https://vpn.net/installers/logmein-hamachi_2.1.0.203-1_amd64.debsudo dpkg -i logmein-hamachi_2.1.0.203-1_amd64.deb
Once you have successfully installed the package, you need to start the Hamachi service using the following command.
sudo service logmein-hamachi start
Step 3: Set Up LogMeIn Network
You can also create the network using the command line. But I prefer to log in to the LogMeIn hamachi dashboard and create a Network under Networks >> My Networks section. For security, purpose assigns a password for your network. On creation of the network, you will get a network id. Use this network id and password to attach remote systems to this network.
Step 4: Join LogMeIn Existing Network
After installing hamachi, let’s join the existing network. But it required being logged in first. There is no need for any login credentials for it, just use the following command.
hamachi login

Logging in .......... ok
Now use the command to join the network.
hamachi join 181-585-285

Password:
Joining 181-585-285 .. ok
Replace 181-585-285 with your LogMeIn network id.
Now you have successfully joined the existing network.
Step 5: Check Hamachi Status and Details
To check the IP address, hamachi client id, and other details about your system just type the command ‘
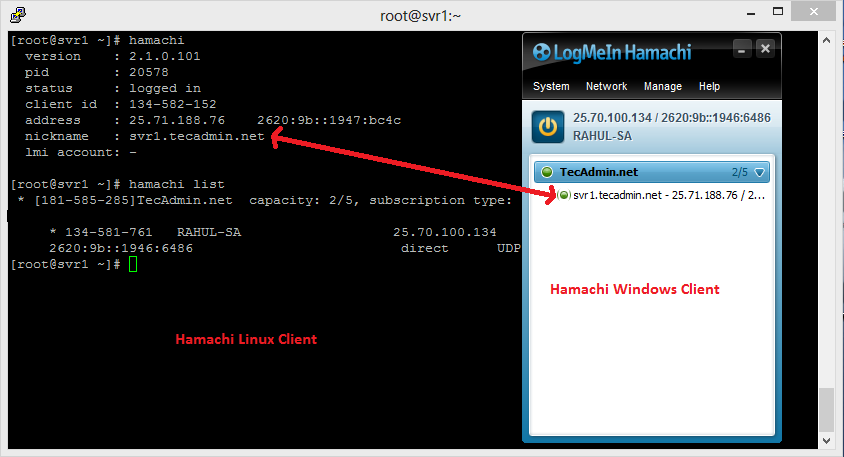
hamachi
Outputversion : 2.1.0.174 pid : 20578 status : logged in client id : 219-270-114 address : 25.71.188.76 2620:9b::1947:bc4c nickname : svr1.tecadmin.net lmi account: -
To check the current joined to the network and other details about that network just use the following command
hamachi list
Let’s try to ping to windows client.
ping 25.70.100.134 -c 4
OutputPING 25.70.100.134 (25.70.100.134) 56(84) bytes of data. 64 bytes from 25.70.100.134: icmp_seq=1 ttl=128 time=1.88 ms 64 bytes from 25.70.100.134: icmp_seq=2 ttl=128 time=2.15 ms 64 bytes from 25.70.100.134: icmp_seq=3 ttl=128 time=1.56 ms 64 bytes from 25.70.100.134: icmp_seq=4 ttl=128 time=1.63 ms --- 25.70.100.134 ping statistics --- 4 packets transmitted, 4 received, 0% packet loss, time 3010ms rtt min/avg/max/mdev = 1.563/1.806/2.150/0.237 ms
The above output showing that system is successfully communicating with the windows clients using the hamachi network.
Conclusion
Congratulations! You have successfully installed and configured LogMeIn Hamachi on your Linux system. Your systems are now connected over a VPN network. The Hamachi provides you hassle free VPN network, without any configuration. You just need to install Hamachi client and connect to the VPN network.


12 Comments
how to fix ERROR: no certificate
Do you have any video of that? I’d like to find out more details.|
It’s great that you are getting ideas from this article as well as from our argument made at this place.|
I am new to linux. I tried to install logmein and it got stuck during the installation, so i force quit the installation. After working on different tasks, i turn-off the server and restarted it. Now i cant even login to the server. Its stuck on the screen where it says “starting logmein hamachi VPN tunneling engine logmein hamachi”.
Please guide me what to do, as its very urgent to start the server.
Very precise, accurate steps given,
it is working for me,,,,amazingly 🙂
thank you for the this post and made my life easier.. LOL
installed: logmein-hamachi-2.1.0.130-1.i486.rpm
If you want to use it by the way, the old version is still working as it doesn’t required up to date libgcc library. More info here with the link to download the old revision : http://community.logmein.com/t5/Hamachi/Hamachi-and-CENTOS-6-4/td-p/103913
Hi,
Same issue with GLIBCXX_3.4.15 not found, cannot go further. Is there any solution ?
I’m using Linux 2.6.32-042stab081.5, it’s a CentOs 6 distrib.
Same problem here, and is not easy to fix that GLIBCXX_3.4.15 issue.
Important that users understand that Hamachi does not work with CentOS5 using RHEL6 because the latest version of GCLIB is sub 3X and this program requires 3.4.15. Installing this into CentOS5.X is done so at the users risk because you have to push GCLIB to an unsupported version that is at your peril. So basically if you see this GCLIB then forget touching hamachi and maybe go with openvpn instead.
I had the same issue. GLIBCXX_3.4.15′ not found (required by /opt/logmein-hamachi/bin/hamachid)
So many issues trying to do things on linux. Trying my best to learn but it seems simple things require lots of hours and research. I would say developers of OS are smart only if they can make tools that are easy to work with. Seems that there is never a straightforward way. You follow instructions and something is always not right… Maybe deep regulation and standardization would be good to have across all platforms.
Starting LogMeIn Hamachi VPN tunneling engine logmein-hamachi/opt/logmein-hamachi/bin/hamachid: /usr/lib64/libstdc++.so.6: version `GLIBCXX_3.4.15′ not found (required by /opt/logmein-hamachi/bin/hamachid)
/opt/logmein-hamachi/bin/hamachid: /lib64/libc.so.6: version `GLIBC_2.14′ not found (required by /opt/logmein-hamachi/bin/hamachid)
Try this. Ammyy Admin is a powerful multi-task solution for remote desktop sharing, remote computer administration and distance learning from any location in the World.