WHM & cPanel is the web-based system management control panel widely used for the Linux hosting environment. To use WHM/cPanel on the AWS environment, we will face the problem with normal instances. So we prefer to use VPC ( Virtual Private Cloud) in aws for installing WHM & cPanel server. This article will help you step by step in brief details for the configuration of the WHM & cPanel hosting environment on AWS instances.
Follow below step by step details for configuring WHM & cPanel on AWS:-
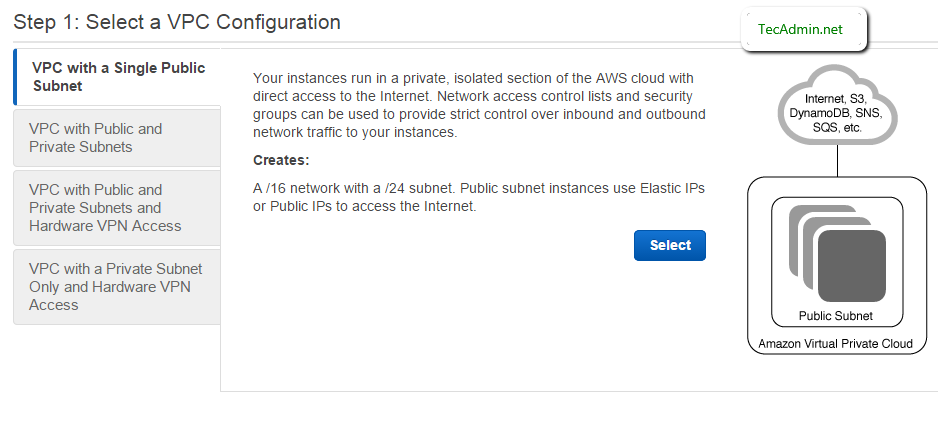
1. Setup VPC (Virtual Private Cloud)
First login to your AWS web console and navigate to below location for creating VPC (Virtual Private Cloud) for your cPanel infrastructure.
- Services >> Networking >> VPC (VPC Dashboard)
- Now click on Start VPC Wizard button.

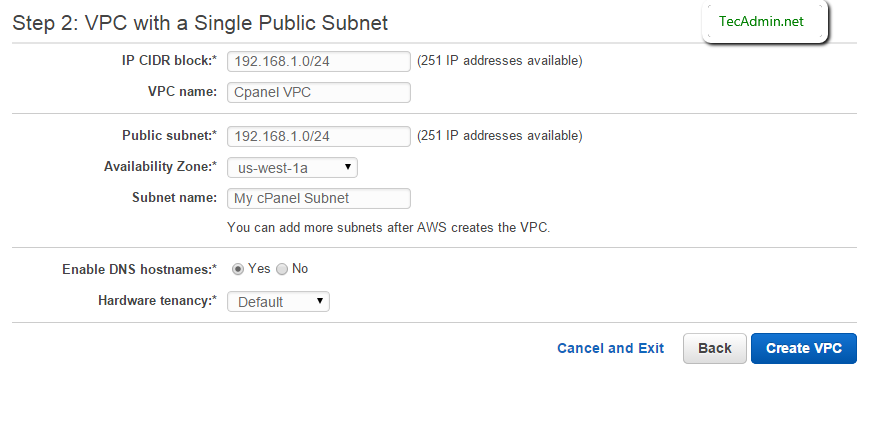
- Select VPC with a Single Public Subnet
- Input your CIDR and Public Subnet
2. Create EC2 Instance
Now go to EC2 instances section of AWS console and start creating a new instance of your choice using the following steps. Remember that cPanel/WHM supports only CentOS, RedHat and CloudLinux operating systems only.
- Select an Amazon Machine Image (AMI)
- Select an Instance Type
- Configure Instance Details
- Add Storage of your preferred size
- Tag your Instance Name
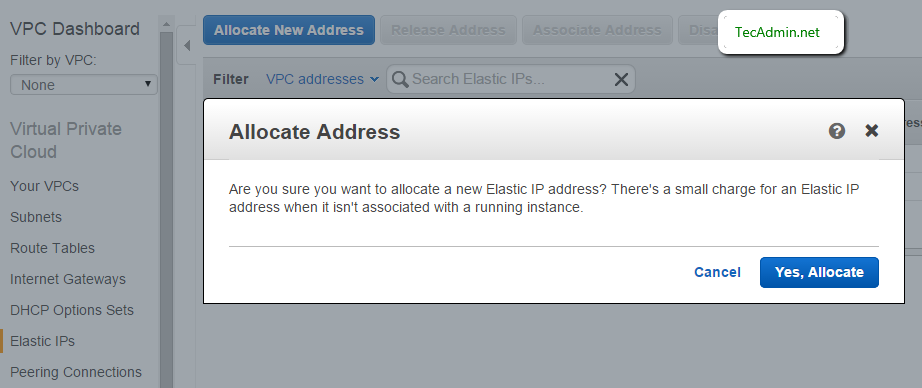
3. Create Elastic IP
Basically Elastic IP is public IP, which is required to access the instance from public networks. To allocate a new Elastic IP.
- Go to VPC DashBoard
- Select Option Elastic IPs
- Click button Allocate New Address
- Now click “Yes, Allocate” to confirm
4. Bind Elastic IP with Instance
- Go to EC2 Dashboard
- Select Elastic IPs link under “NETWORK and SECURITY” Section in sidebar
- Select your elastic ip and Click “Associate Address”
- Select You newly created instance and click Associate
5. Login to Server and Update
- Login to Server as root user using pem file generated during instance creation.
ssh -i server.pem root@11.22.33.44 - Update all packages on your system using following commands
yum update - Reboot instance.
reboot
6. Setup Hostname
Use below command to set a hostname temporarily on you rsystem.
# hostname cpanel.example.com
Now make changes permanent by the editing configuration file.
- Edit /etc/sysconfig/network configuration file for RHEL & CentOS
HOSTNAME=cpanel.example.com
- For Ubuntu and Debian systems edit /etc/hostname and enter hostname there
cpanel.example.com
- Now edit /etc/hosts for binding hostname with local system ip.
10.0.0.100 cpanel.example.com
7. Install cPanel & WHM
At this stage, our system is prepared for installing cPanel. Use the following commands to complete the installation. This process will take time as per your network speed and system configuration.
cd /home
yum install wget
wget -N http://httpupdate.cpanel.net/latest
sh latest
8. Setup NAT
Sometimes the system doesn’t automatically detect NAT on your instance. Then you can run below command to do it manually
/scripts/build_cpnat

[output]
info [build_cpnat] 172.32.121.55 => 54.6.169.157
Now to Navigate to Home >> Server Configuration >> Basic cPanel & WHM Setup in your WHM and check for The IPv4 address (only one address) to use to set up shared IPv4 virtual hosts shoud show your public ip address.
9. Open Ports in Security Group
Now open all inbound ports in the AWS security group used by the instance or open specific ports for inbound network listed in the following article.
10. Access cPanel & WHM
Congratulation’s your WHM & cPanel setup has been completed successfully. You can access WHM and cPanel using following urls.
WHM : http://cpanel.example.com:2086WHM with SSL : https://cpanel.example.com:2087cPanel : http://cpanel.example.com:2082cPanel with SSL : https://cpanel.example.com:2083
11. More Configurations
You may use following articles for more configuration for WHM & cPanel servers.
- Install CSF (ConfigServer & Security Firewall) on cPanel
- Install Services SSL Certificates in WHM & cPanel
- Enable Apache Gzip Compression Globally

7 Comments
What are the limitations of Cpanel?? Bandwidth or any other issue??
Hi,
Excellent article, however just a correction needed.
i.e WHM with SSL should use https
Likewise cpanel wih SSL should use https.
How do you add additonal IP’s to cPanel for SSL domains?
I get a issue while installing WHM & Cpanel on My Amazon Machine Image (AMI). It showing licence isseu again and again please suggest me how to install WHM & Cpanel on Amazon Machine Image (AMI) and my Redhat / Centos System as well.
” 2015-07-02 06:41:05 521 ( INFO): Beginning Installation v3…
2015-07-02 06:41:05 394 (ERROR): The system could not detect ‘/etc/redhat-release’.
2015-07-02 06:41:05 395 (ERROR): The system detected an unsupported distribution. cPanel & WHM only supports CentOS 5, 6 and 7, Red Hat Enterprise Linux® 5 and 6, and CloudLinux™ 5 and 6.
2015-07-02 06:41:05 396 (FATAL): Please reinstall cPanel & WHM from a valid distribution.
Removing /root/installer.lock. ” Thats what happens when i try to install cpanel whm on ubuntu. Any solutions ?
Hi.. Thanks for the steps…. but plz provide detailed instructions will be better….
Hi Williams,
We will try to provide detailed instruction’s soon.