VNC stands for “Virtual Network Computing” is a sharing system or set of protocols for sharing desktops. There is much software available to access Linux-based desktop remotely including, TigerVNC, TightVNC, Vino, vnc4server, and more.
TigerVNC is a free, open-source, and high-performance VNC server used to control or access Linux-based desktop remotely. It is a client/server application that allows you to interact with graphical applications on remote machines.
In this tutorial, we will show you how to install and configure a VNC server on Ubuntu 20.04.
Step 1 – Install Desktop Environment
By default, Ubuntu Server does not include a Desktop Environment. TigerVNC server is designed to controls only desktop systems. So you will need to add a desktop environment to your server.
First, update and upgrade all installed packages with the following command:
apt update -yapt upgrade -y
Once your system is updated, install the Tasksel utility to install a desktop environment:
apt install tasksel -y
After installing Tasksel, launch the Tasksel utility with the following command:
tasksel
You should see the following interface:
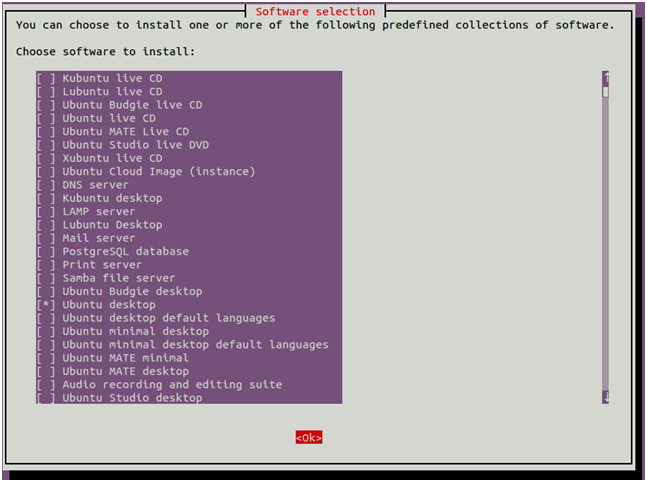
Use the arrow key to scroll down the list and find Ubuntu desktop. Next, press the Space key to select it then press the Tab key to select OK then hit Enter to install the Ubuntu desktop.
Once all the packages are installed, you will need to set your system boots into the graphical target. You can set it with the following command:
systemctl set-default graphical.target
Next, restart your system to apply the changes.
Step 2 – Install TigerVNC Server
By default, the TigerVNC package is available in the Ubuntu 20.04 default repository. You can install it by just running the following command:
apt install tigervnc-standalone-server -y
After installing TigerVNC, create a new user and set a VNC password for that user.
First, create a new user named hitesh with the following command:
adduser hitesh
Next, switch the user to hitesh and set a VNC password with the following command:
su - hiteshvncpasswd
Provide your desired password as shown below:
Password:
Verify:
Would you like to enter a view-only password (y/n)? n
Next, start the VNC server using the following command:
vncserver -localhost no
Once the VNC server is started, you should get the following output:
New 'ubuntu2004:1 (hitesh)' desktop at :1 on machine ubuntu2004

Starting applications specified in /etc/X11/Xvnc-session
Log file is /home/hitesh/.vnc/ubuntu2004:1.log

Use xtigervncviewer -SecurityTypes VncAuth,TLSVnc -passwd /home/hitesh/.vnc/passwd ubuntu2004:1 to connect to the VNC server.
You can verify your running VNC server using the following command:
vncserver -list
You should get the following output:
TigerVNC server sessions:

X DISPLAY #	RFB PORT #	PROCESS ID
:1		5901		1719
Step 3 – Install VNC Client
In this section, we will install the RealVNC VNC client on the remote machine and connect it to the VNC server.
You can download the RealVNC client from the RealVNC download page.
Once the download is completed, install the downloaded package with the following command:
dpkg -i /home/vyom/Downloads/VNC-Viewer-6.20.529-Linux-x64.deb
Next, launch the VNC client from the Gnome application menu. Then, Click on the File menu => New connection to create a new connection. You should see the following screen:
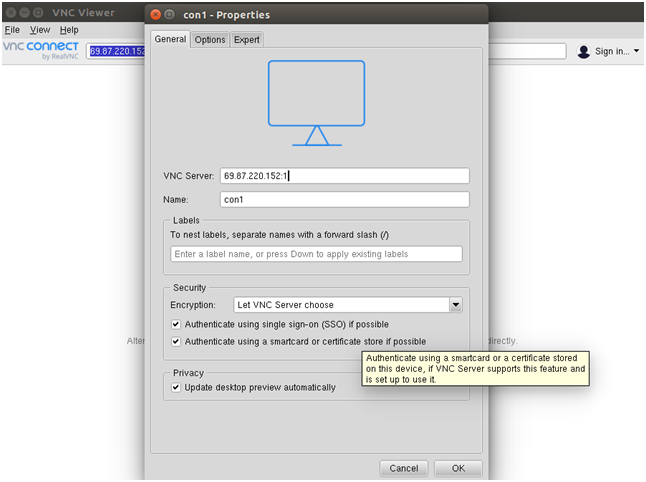
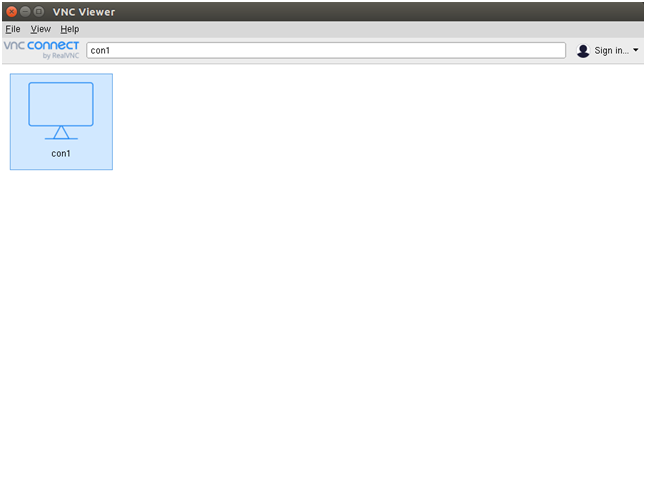
Provide the Name and IP address along with VNC session ID :1 of your VNC server and click on the OK to save the connection. You should see your saved connection in the following screen:
Now, double click on your newly created connection. You will be asked to provide your VNC password as shown below:
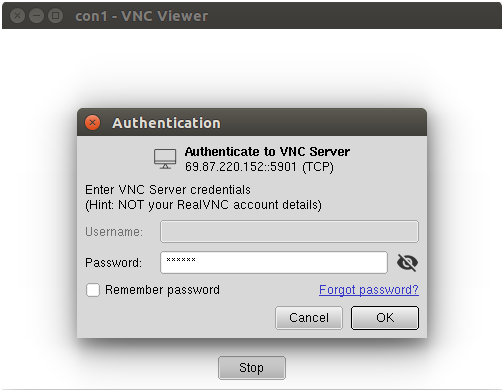
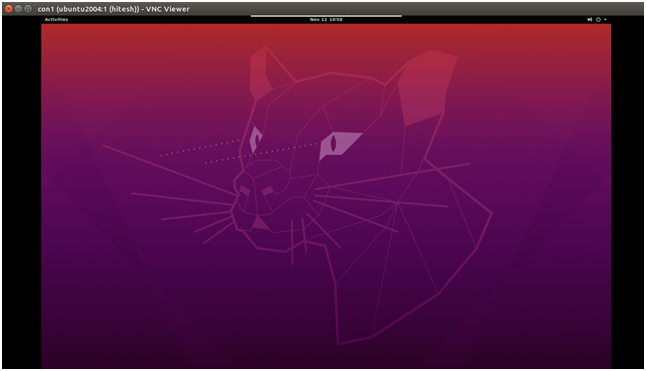
Provide your VNC password and click on the OK. Once connected, you should see your Ubuntu desktop screen:
Step 4 – Configure VNC to Work with Your Desktop Environment
Before starting, stop the VNC instance using the vncserver command with a -kill option and the server session ID as an argument.
vncserver -kill :1
You should get the following output:
Killing Xtigervnc process ID 1719… success!
Next, you will need to configure TigerVNC to work with Gnome. You can do it by creating new file xstartup inside .vnc directory:
su - hiteshnano ~/.vnc/xstartup
Add the following lines:
1 2 3 4 5 | #!/bin/sh exec /etc/vnc/xstartup xrdb $HOME/.Xresources vncconfig -iconic & dbus-launch --exit-with-session gnome-session & |
Save and close the file when you are finished. The above script will be executed automatically whenever you start or restart the TigerVNC server.
Next, give execute permissions to the ~/.vnc/xstartup file:
chmod u+x ~/.vnc/xstartup
Step 5 – Create a Systemd Service File for VNC
Next, you will need to create a systemd file for TigerVNC to manage the VNC service. You can create it with the following command:
nano /etc/systemd/system/[email protected]
Add the following lines:
[Unit]
Description=Remote desktop service (VNC)
After=syslog.target network.target

[Service]
Type=simple
User=hitesh
PAMName=login
PIDFile=/home/%u/.vnc/%H%i.pid
ExecStartPre=/usr/bin/vncserver -kill :%i > /dev/null 2>&1 || :
ExecStart=/usr/bin/vncserver :%i -localhost no -geometry 1024x768
ExecStop=/usr/bin/vncserver -kill :%i

[Install]
WantedBy=multi-user.target
Save and close the file then reload the systemd daemon with the following command:
systemctl daemon-reload
Next, enable the VNC service to start at system reboot with the following command:
systemctl enable [email protected]
Next, start the VNC service with the following command:
systemctl start [email protected]
Conclusion
Congratulations! you have successfully installed and set up the Tiger VNC server on Ubuntu 20.04. You can now connect your Ubuntu system from any desktop system and manage it with easy to use graphical interface.

17 Comments
Why would you create this separate “hitesh” user? I’d prefer to use my own login.
Step 1 blocks the SSH connection to my dedicated server… Thank you for causing me problems. Linux evangelists playing Linux evangelists…
WE DON’T LIVE IN YOUR BRAINS
Working just great on 20.04.
Reading through the issues people have been seeing, a couple of notes:
* sudo when you get permission errors
* if a file doesn’t exist, create it with touch, e.g. touch ./.myfile creates an empty file called .myfile in the current directory
I ran “systemctl set-default graphical.target ” and restarted now every single port is closed
Hello,
Did you solve this? I had exactly the same thing happen to me…
Hello
I managed to install it but then i decided to go in another road.
I uninstalled tigervnc-standalone-server but when i try to delete the user hitesh i get an error saying :
“user hitesh is currently used by process 2251”
Do you know how can i remove this user?
This is the most complicated program to install why does it not install like the Windows version. I tried to install on Ubuntu 20. Non professional
These instructions do not work on Ubuntu 20.04.02 LTS Desktop. Issues found:
0. Service file contents needs additional directions to change the username from “hitest” to whatever user you created.
1. TigerVNC doesn’t like the above specified contents of ~/.vnc/xstartup. /etc/vnc/xstartup does not exist. Even after changing to /usr/bin/Xvnc, it will start neither on the commandline nor as a service. Starting on the commandline results in an error message says to start with something simple like /usr/bin/xterm, which doesn’t even exist in 20.04. I replaced the contents with the following:
#!/bin/sh
[ -x /usr/bin/Xvnc ] && exec /usr/bin/Xvnc
[ -x $HOME/.Xresources ] && xrdb $HOME/.Xresources
vncconfig -iconic &
bus-launch –exit-with-session gnome-session &
Using this, I could successfully start the server on the commandline or as a service. However, the screen is blank, which is worthless. I am using the TigerVNC viewer on MacOS. I’m reading that there’s a bug in gnome that may be causing this.
Here’s what finally worked for me: use a different desktop and window manager.
1. apt install lxqt
2. apt install openbox
3. Use these contents in the ~/.vnc/xstartup file
#!/bin/sh
# Uncomment the following two lines for normal desktop:
unset SESSION_MANAGER
#exec /etc/X11/xinit/xinitrc
exec openbox-session &
startlxqt &
[ -x /usr/bin/Xvnc ] && exec /usr/bin/Xvnc
[ -r $HOME/.Xresources ] && xrdb $HOME/.Xresources
xsetroot -solid grey
vncconfig -iconic &
I hope this is helpful to someone else.
Now that worked like a treat! Thank you so much.
Thank you so much!! Your suggestion worked perfectly! I too was failing to get gnome to work.
Hi its not working on Oracle Cloud instance vnc connector gets timed out
fastest way to fix this is opening ports using firewalld
I get a strange error message. I feel like I missed a step in your documentation, but I can not figure out what I did wrong.
/home/kiosk/.vnc/xstartup: 2: exec: /etc/vnc/xstartup: not found
It works for me. Thank you. (ubuntu 18.04)
It doesn’t work.
How do I uninstall it?
Hi Mike,
What issue are you facing?
good intro, unfortunately the systemd unit file doesn’t work neither with 20.04 nor with 20.10.
the error in journalctl is following:
“`
pam_systemd(login:session): Failed to release session: Access denied
“`
and no vncserver instance is created. I have seen that couple of other people have the same issue but no real solution…